Saturday, May 21, 2011

Calling All Quilters: do. {Good Stitches} A Charity Bee needs your help!


do. Good Stitches {a Charity Bee}

As most of you know, I am a member of do. Good Stitches {A Charity Bee in the Hope group which benefits Threading Hope. do. Good Sitches was created by Rachel of Stitched In Color. Without going in to details, 3 of our quilters have had to step down from the group after the current round which ends in June. We are in extreme need of quilters to replace them in our group.

hope circle november sunshine quilt 2
Designed by Emily of This Little Life of Mine

What do the quilters do you might ask? All Quilters are first Stitchers.

do. Good Stitches {a Charity Bee}

Stitchers: Every month ALL members complete 2 blocks for their circle. At the beginning of each month Stitchers will receive instructions from the Quilter as to color scheme and block design. The instructions are posted here at the Flickr group in the discussions threads. Blocks will typically measure 12.5 x 12.5″ unfinished. You must share pictures of your completed blocks at our Flickr group. Completed blocks must be mailed to the Quilter by the end of each month, and received by the Quilter by the 10th of the next month.

September "Hope" Quilt- almost done!
Designed by Krista of Spotted Stone Studios

Quilters: Each circle has 5 Quilters. All Quilters make blocks each month, just like a Stitcher. In addition, the Quilters take turns planning, assembling and finishing a quilt once every 5 months. You’ll need to communicate your design to the Stitchers, keeping in mind that they’ll be pulling fabrics from their fabric stash. Once all blocks are received, the Quilter pieces the quilt top, and finishes the charity quilt within 30 days. You must share a photo of the finished quilt in our Flickr group. The completed quilt is mailed directly from the Quilter to your circle's charity.

IMG_4516
Designed by Hollie of Undercover Crafter

We have done some AWESOME quilts. Seriously. I am constantly amazed at the creativity of this group.

One of our circle's more recent quilts was designed by Emily of This Little Life of Mine and inspired by this color palate:

do good march

We were all asked to make 12.5" blocks with a white background and circles in the colors above. My blocks:

do. Good Stitches {A Charity Bee} - Hope Circle Blocks

Here's the finished quilt:
Hope Circle- March Quilt

We also made this quilt that I designed in honor of a friend who has passed. The group was asked to make wonky cross blocks using this tutorial by That Girl That Quilt in purple, green, and blue. My blocks:

"Hope" January Blocks

And the top:
do. Good Stitches {A Charity Bee} - Hope January Quilt

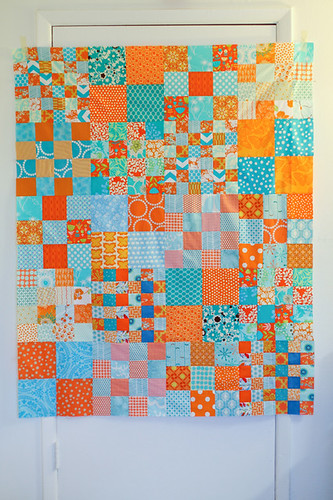
This awesome aqua and orange quilt designed by Jeni of In Color Order was based on this color palate:


We were asked to make 12.5" checkerboard blocks with squares of any size. I really like how all of the blocks came together! My blocks:

do. Good Stitches {A Charity Bee} December Blocks

And the top:


I love the quilt we made based on Little Miss Shabby's scrap buster tutorial that Hollie of Undercover Crafter designed. I missed the boat on the color scheme but they ended up still working with Hollie's design. My blocks:

"Hope" October Stash Buster Quilt

And here is the finished quilt top:


There are so many other fabulous quilts made in this group. A little browsing in our flickr group will allow you to see them all plus all the work done by the other 7 circles in this group.

Quilters, we need you. If you are willing to sign up as a quilter in the Hope group please contact me (threadedmess [at] gmail [dot] com) and I will get you connected with the right people.

Happy Quilting

Friday, May 20, 2011

Inspired: Tangerine and Aqua

I really enjoyed finding fabrics that went with my Chartreuse and Raspberry color inspiration collage earlier this week so I've decided to try another one. If you all like them let me know and maybe I'll make it a regular thing here at Threaded Mess.

Today's inspiration comes from this collage in Tangerine and Aqua:
Yes, it's another wedding themed collage! My friend is getting married next March so that's my excuse :)

Pops of white is what keeps these two colors from being overpowering. The different saturations of both colors gives this palate interest and movement. Also adding interest and movement is the combination of tone on tones, geometrics, florals, stripes, and solids.

What fabrics you might ask? Here are a few I found that work with this palate and style (plus a lot of white of course):

Tangerine and Aqua Inspiration Fabrics 1
Tangerine and Aqua Inspiration Fabrics 2

You may or may not have noticed but all of the chartreuse and raspberry fabrics were from QuiltHome.com, one of the shops I frequent online. This week, all of the fabrics are from Hawthorne Threads, another favorite online shop. All of the above fabrics are currently available or will be available soon at Hawthorne Threads. Of course, there are many out of print (OOP) or hard to find (HTF) prints out there that work both with this palate and style too, but I have tried to stick to fabrics still readily available.

I am very excited about Joel Dewberry's new Heirloom fabric line coming out. The Citrine colorway works really well with this palate and style, and is featured above right in the middle of in the second grouping.

It won't take you long to find some great handmade creations on flickr in this colorway. Here are some of my favorites:

Tangerine and Aqua Flickr Projects

Have you made something in this colorway? Leave a comment with your link so we can all check it out :)

Happy Quilting

Wednesday, May 18, 2011

do. Good Stitches {A Charity Bee} - "Hope" June Project

The end of this month and beginning of next are going to be crazy for me so I went ahead and posted the do. Good Stitches {A Charity Bee} Hope project for June lest I forget later. I figured I would go ahead and share it with you all as well in case you need some color inspiration for the Marshmallow Brochette QAL or are looking for a way to get involved in sewing/quilting for charity.

We're making a super girly quilt!

The color inspiration for this quilt is this collage I found online in Chartreuse and Raspberry:

and the block we will be making is the spiderweb block. I found this great tutorial by Elizabeth Hartman for Sew, Mama, Sew! for us to use (with her permission of course).
 
I want the blocks to be 12.5" unfinished so I've asked the members to cut their square to 13.75" (per instructions add 1.25" to the desired block size). Their strips will also need to be a bit longer than stated in the tutorial since we are making larger blocks (between 1.5” – 2.5” wide and up to about 10” long).

What fabrics you might ask?

I've asked everyone to start with a white square which will serve as the foundation for the strips and become the pointed star in the middle (same as tutorial). A bit off white is fine too.

A scrappy look definitely works well for this pattern so I am not too concerned about which specific prints they use. However, I have asked them to stay within the color story as much as possible (yellowish greens, berry pinks, and white/off white in varying saturations) and told them it's fine to mix in some coordinating solids too! For inspiration's sake here's a mosaic of some prints that work in this color story:

do. Good Stitches {A Charity Bee} "Hope" June Inspiration Fabrics 1
do. Good Stitches {A Charity Bee} "Hope" June Inspiration Fabrics 2

There are many, many other prints that will work and hopefully they already have some in their stash.

As always, I am leaving this project open to any of my readers who want to participate as well. Send me an email and I will give you my mailing address where you can send your blocks. The Hope group makes quilts benefiting Threading Hope which coordinates the donation of quilts to children and those in need in underprivileged countries like Hati and Malawi. If you would like to join the do. Good Stitches {A Charity Bee} check out the flickr page for info on how you can get involved in a new sewing circle.

Happy Quilting!

Monday, May 16, 2011

Marshmallow Brochette QAL - Final Mockup and Button

I know I said I would be doing one post a week, but this is more of an enhancement to the last post and not additional work. Without further ado, here is the final mockup for the lap quilt:

Marshmallow Brochette - Final Mockup

I chose to add an additional column of squares and an additional column of 5" strips so that the width of the quilt is more proportional to the height (finished size is now about 63 x 83 which will work well with a twin sized batting). I also added a 6th square to each column to make cutting and piecing easier based on the standard widths of fabric.

Also, I forgot to create a button for this QAL! Toni was nice enough to point that out and also make a button for me. Isn't she sweet? Here's Toni's button:


This is something I have only tried once before so I wanted to try my hand at it again. Here's my attempt at a button:


I like both of them for different reasons. Use which ever one you'd like on your own blog or website. Just make sure to link the image back to this blog so that others who want to join in the fun can find the Marshmallow Brochette QAL!

Happy Quilting

p.s. - this week we are gathering our materials. If you need some insight into my color selection process you can check out my original post on the fat quarterly blog for more information on how I selected fabric for my mini quilts.

Sunday, May 15, 2011

Marshmallow Brochette QAL-Part 1

Boyish Mini Quilt

The time for the first Threaded Mess Quilt Along has finally arrived! Are you ready?

Great!

First, check out the flickr group I set up and join up! The group is open for you to join and share pictures of your progress during the Quilt Along. It will remain open for future QALs as well.

Second, despite the mock-up in my previous post I have decided to add a 6th column of squares, a 6th square to each column, and a 5" column to the lap quilt size of this pattern which extends the width of the quilt a bit more. I'm working on another mock-up but things have been a bit hectic around here so I will include it in a future post.

Third, let's get started!

My plan is to post on a weekly basis, providing detailed information for each step in the process.

Week One: start gathering materials

Mini Quilt Tutorial 
MINI QUILT SUPPLIES - finished size about 32″x32″

Thread – for piecing and quilting
Rotary cutter, ruler, and mat to cut your strips
A piece of batting at least 36″x36″
Safety Pins (or whatever you use to baste your quilts)
Clips or pins to tack down your binding
Sewing machine


Fabric: The following cuts assume you are working with fabrics at least 42″ wide. If you are working with smaller pieces you will need to adjust to compensate.
3/4 Yard for your background fabric
1/2 Yard for your border/connecting strips (the fabric bordering and connecting your squares)
9 5″x5″ squares (I pulled from a Kona Solid Brights charm pack)
1/2 Yard for your binding
1 Yard for your backing

The above are the minimum fabric requirements for this project. 


**********************************************************

LAP QUILT SUPPLIES - finished size about 83 x 63

Thread – for piecing and quilting
Rotary cutter, ruler, and mat to cut your strips
A twin sized package of batting (72"x93")
Safety Pins (or whatever you use to baste your quilts)
Clips or pins to tack down your binding
Sewing machine

Fabric: The following cuts assume you are working with fabrics at least 42″ wide. If you are working with smaller pieces you will need to adjust to compensate.
2 2/3 Yard for your background fabric
1 Yard for your border/connecting strips (the fabric bordering and connecting your squares)
36 5″x5″ squares
1 Yard for your binding
2 Yards of 108" backing fabric or a pieced combination of smaller width fabrics

The above are the minimum fabric requirements for this project.  

Have a question? Ask it on the Q&A on flickr or here and I will try to answer it as quickly as possible. 

We will be working on our layouts next week. I can't wait to get started on this project with all of you!

Happy Quilting