Showing posts with label batting. Show all posts

Wednesday, August 18, 2010

Batting Scrap Challenge - Project 2

A few weeks ago I started a challenge project to use batting scraps as inspiration for a project or two. I thought it would be creatively inspiring to think outside of the box and turn trash into treasure. So far no one has decided to join my challenge that I am aware of. If I am wrong let me know! Leave a comment on any batting scrap challenge post and let me know what you're up to.

I mentioned in the original post that there would be perks involved for those who decide to participate. I've decided to give away at least one of my batting scrap challenge projects to a lucky winner. To win, you must join in the challenge fun! Each project you complete with batting scraps will earn you a chance at winning one of mine. Go to the Batting Scrap Challenge page and leave a comment saying you're going to join in the fun and follow the challenge instructions.

My first project was a nifty book cover perfect for mass market paperback books:
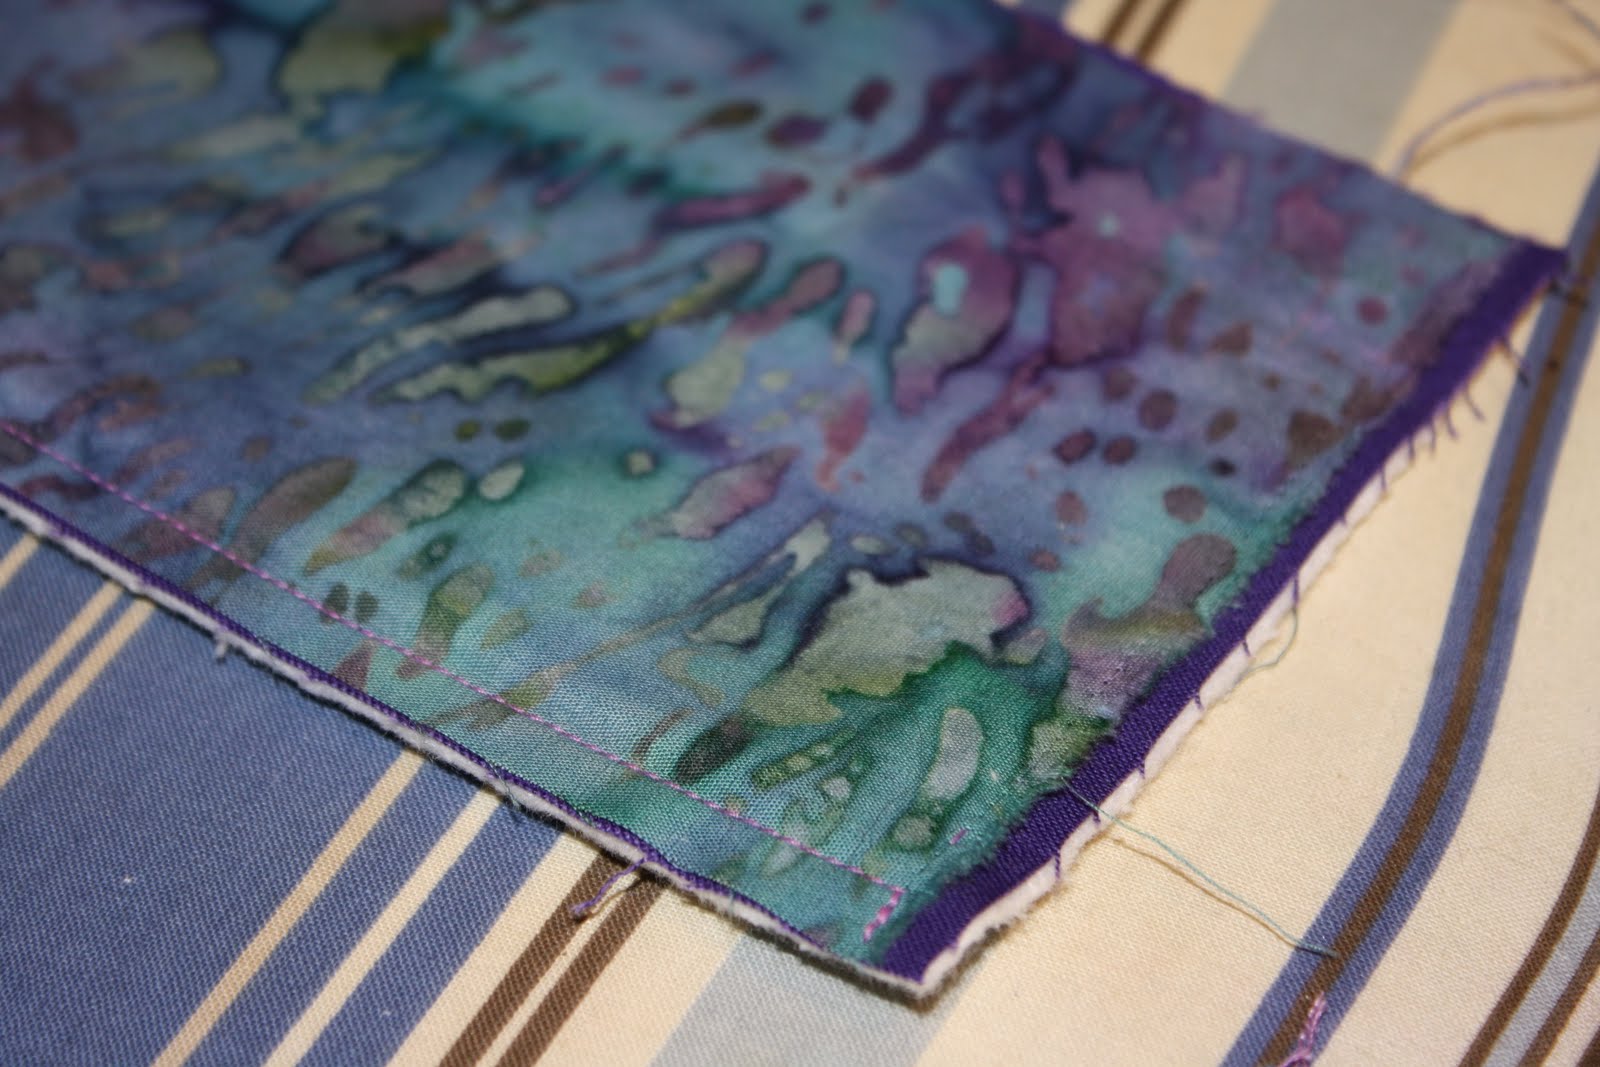
Tonight I made another book cover from scraps of fabric and batting. The fabrics on the front of the cover are leftovers from Matt's I Do quilt and the batting and solid fabric on the inside of the cover are from one of the wedding attendant quilts (ignore the lint lol):


I also made a new pin cushion from Amy Butler Love selvages leftover from my Love Pinwheels quilt:

I was trying to make something with piping like this pincushion:
By Cindy at aroundtheblockdesigns.blogspot.com
But....I had to cut the piping off....it was bad. I had a lot of fun working with selvages though! I find it fascinating that something I've always thought should be thrown away can look so cool.

The pincushion and second book cover will also be up for grabs for a lucky winner of the Batting Scrap Challenge so get started on your own projects for your chance to win. Every project you share will be a chance to win any of my projects!

Happy Quilting!

Thursday, August 5, 2010

Batting Scrap Challenge - Project 1

Hello everyone!

If you haven't already checked out this post about the Batting Scrap Challenge, go check it out!

Ok, now that you're back I'll show you what I've been up to tonight.

First, some background info: I love to read and prefer hardcovers because I DESTROY paperbacks. I learned this the hard way when I borrowed The Da Vinci Code from my friend Nick. By the time I was done with his book it was scratched, worn away, water marked, and bent to the point that I was embarrassed to return it to him. And I was being careful!


From that point forward I swore off paperbacks and stuck to buying hardcovers. One day I found this book (hardcover), Dark Celebration, in a bargain bin at Borders for $3 and got totally hooked. The story is about a race of people (Carpathians) similar to humans but with super strength, speed, ability to shape shift, and other supernatural powers who become vampires if they don't find their soul mates, and have to hunt their brethren who succumb to the temptation of power and lust for killing. I had no clue the book I picked up was #14 of a 20+ book series still being written and that most of the books are only available as mass market paperbacks. That's how they get you with those bargain books! They hook you into a series!

I liked the first book so much I decided to buy a couple more from the beginning of the series. When they arrived from Amazon I decided to make a quilted book cover to keep myself from destroying them. My first attempt was pretty lame. I took some Amy Butler Midwest Modern fat quarters in my stash and some Amy Butler Midwest Modern scraps from a blue and green quilted nursing cover I made my sister and (without a pattern) made myself a cover that would work for a mass market paperback. I found out first hand why it's better to use a mitered binding rather than sewing the strips together in a straight line (very bulky). I also made the mistake of using minky fabric for the binding on the book sleeves (I don't really know why I thought this would be a good idea) so they ended up more bulky than I would have liked but the book cover worked for my purpose so I was pretty happy.

Since that first book cover I have tried to perfect the process. I think the quickest method so far was to just buy fabric already quilted from my local JoAnn Fabrics! JoAnn.com seems to be down right now but check out this link at Fabric.com to see what I am talking about. The only problem with that method is you have to bind the edges of the sleeves, bind the cover, and hand sew the bindings to the back which adds more time to the process.

Tonight I tried something a little different. I wanted to avoid hand sewing if at all possible so as I constructed my book cover I kept in mind how it needed to be sewn together to ensure no hand sewing was necessary. I used scraps from Maura's Strata Square quilt made from Bali Pop in Kiwiberry. The scraps were teeeeeeeny tinnnnnny leftovers:


Which I sorted and combined to form a piece I could use for the outside of my book cover:

I ironed as I pieced:
And kept adding and adding:

Until I had a rectangle big enough for the cover:
I found another scrap of a purple and blue fabric (from the batik bundle Ginny gave me for Christmas--thanks again Ginny!) that was the perfect size for the inside and the sleeves:
I pulled out some batting scraps from the wedding attendant quilts (I think this was from Maura's too):
Cut some for the sleeves and the cover and started sewing keeping in mind that I wanted all my unfinished edges to end up inside the cover:
Once I had the sleeves done I arranged them, the inside fabric, batting, and outside fabric and pinned them with safety pins:
I sewed around the edges leaving myself about 2 inches to turn it right side out, pressed it, sewed about 1/8 of an inch all the way around to close the hole I left myself, and then quilted down the middle to fix some of the odd fitting scraps I used (totally quilted it out lol):
And presto change-o, a book cover:
I am still perfecting this process so until I do I am not going to do an official tutorial but I hope this project has inspired you to go get your binding scraps and make something totally awesome! I'm signing off for the evening to go do some reading using my new book cover. Thanks for letting me share with you!

Happy Quilting!

Wednesday, August 4, 2010

Why I'm Trying to Go Modern

Let me preface this post by first saying that I think traditional quilts and art quilts are absolutely gorgeous. I love going to quilt shows, reading quilt books, and surfing the web to see the beautiful work people have done in both categories and I definitely want to try my hand at both! Nothing in this post is intended to diminish or in any way criticize those quilting styles. That being said...

A few weeks ago I decided Northern Virginia needed a Modern Quilt Guild option. Why? I hope I don't offend anyone by saying this, but I just didn't think I would fit in with the quilt guilds in my area. My concern is that my lifestyle, availability, interests, age, fabric selections, and design style would be so different from others in more traditional guilds that I wouldn't feel as rich of a connection as I would with people who are like me and therefore not enjoy my experience as much.
  • I work all the time. I often work late nights, early mornings, and on weekends too. I never really know what my schedule is going to look like
  • I can't go to workshops or meetings in the middle of the day during the work week (because I'm working) 
  • I am 27 (happy birthday to me!) so much younger than most of the quilters I know
  • I'm drawn to fabric designers like Amy Butler, Joel Dewberry, Heather Bailey, Lizzy House, Anna Maria Horner, and Kona Solids 
  • I'm drawn to patterns by Cherri House, Denyse Schmidt, Amy Butler, and I also like making my own up because I like figuring things out for myself and learn better from mistakes than instructions
  • Quilting is something I love to do but it's not my only hobby. I also like to read, play xBox, wii, nintendo ds, and computer games, entertain friends and family (dinner, drinks, board games, etc), play with Lucy, take pictures, scrapbook, travel, decorate, draw, paint, and make jewelry (Lovie and Boo).
  • I've only been sewing since December 2008
I really like the concept of quilting as a stool with 3 legs: traditional, art, and modern. Modern quilting encompass the basic materials and techniques of traditional quilt making with the bend-and-break the rules approach of art quilting. While many traditional quilt guilds in my area have members who's work falls into the modern category, there isn't a guild in my area that primarily embraces that aesthetic. So I started one!

Some cool things I've learned so far:
  • you can create a free website on webs.com but if you pay extra you get more features
  • you can create a cool web toolbar icon at favicon
You're here so you have probably seen some of my quilts here, here, here, here, other stuff here and here and like my style. While I wouldn't totally put me in the "modern" category looking at those examples, consider that my stash is filled with more modern fabrics I just haven't cut into yet because my life is crazy and because I haven't figured out what I want to do with them yet. I do love batiks which probably makes me a traitor to the modern movement but they are just sooooooo so pretty.

I recently updated the home page with lots of information about Modern quilting so if you are interested go check it out. If you find yourself agreeing with the comments and "buzz", live in the Northern Virginia area (or surrounding area), and want to join just apply through the web!

Happy Quilting!

p.s. - I'm working on a batting scrap project tonight!

Tuesday, August 3, 2010

Threaded Mess Challenge Project: Batting Scraps

Hi Readers and Followers!

One of the things I have wanted to do with my blog are challenge projects where all of us would work on something theme related together. Guess what?? I have a challenge project for you!

Nancy over at Patchwork Penguin, who might I add is the first official NOVA Modern Quilt Guild member besides myself (sweet!), recently posted about not knowing what to do with batting scraps and inspired this challenge project. This is what her batting scrap stash looks like:

picture taken from Nancy's blog
Here's my stash:


My problem is that I rarely follow a pattern or have one to begin with. I don't take the time to plan things out on paper often and I don't always stick to whatever planning I have done. The pinwheel quilt is a great example of that! I started making the pinwheels, I had some fat quarters so I decided to border the pinwheels, I liked them so much I wanted more so I made more pinwheels and strips for borders, I've changed my design several times and still haven't decided which one I like best, and I have to figure out how to make it big enough for my guest bedroom bed. It started out as a lap quilt and now it has more than doubled that size. When I ultimately finish my quilt top I will likely have to get a batting that doesn't fit my top perfectly which means I am going to have some scraps. So where does the challenge come in? Well...

I challenge YOU, Readers and Followers, to join me in creating something from batting scraps.

How this works:
  1. Become a follower. There will be perks involved (hint, hint). If you already are, skip this step (and thanks for following!!). To follow, click the "follow" button on the right side of my blog.
  2. Leave a comment on this post letting me know you're going to participate in the challenge.
  3. Grab this button and put it on your website (if you have one)
 
Rules:
  • You must use scraps of batting (no new batting) for this project. If you don't have any, ask a friend (and get your friend involved too!).
  • You must create something you or someone else can use i.e. a finished product that can be hung, wrapped, pinned, stuffed, covered, snuggled, tossed, or otherwise used and loved. 
  • You must take pictures as you make your batting scrap project.
  • You must send me those pictures once you're done and tell us how you made it. 
I will be showing off my favorites on this blog (with your permission of course). If you want you can add them to the Threaded Mess flickr group or send them to me by email at threadedmess(at)gmail(dot)com.

I don't know about you but I work better with a deadline so let's say that all challenge projects must be submitted by October 3rd (that's 2 months!) which should give you plenty of time to participate even if you don't get to sew very often. 

1,2,3, go!

Happy Quilting!

p.s.- future challenge project hints: save your scraps! save your selvages! save your strips!

Wednesday, July 14, 2010

The VT Quilt is Finished!

It is done. 

The Breakdown:
*100% Cotton batiks
*Combination of oranges and maroons (VT colors)
*Square blocks made from 6 strip rails
*Blocks were cut using a square ruler turned 45 degrees so that the corners line up between the 3rd and 4th strip
*Blocks were pieced to make a diamond effect
*Backing is maroon with orange and green leaves with gold outline
*Quilted with variegated orange, gold, and maroon thread on top and maroon on the bottom
*Quilting design is 4 petal flowers that echo 3 times with curved lines connecting the flowers
*Binding is the same as the backing

If you haven't been following my blog for this entire project you can check out my older posts for more information:

Making the rails and blocks
Arranging the blocks
Quilt top
Basting and quilting
Finished quilting and trimming
Binding

If you want to make make a quilt like this you will need around 60-72 strips measuring 2.5"x45" (jelly roll size). The actual width of your strip may vary a bit but you want to use the full width of the fabric from selvage to selvage, whatever that may be. Combine a random assortment of 6 strips sewn together on their longest side to create your "rail".

When I first tried this technique (sewing long strips together) with Alissa's Cuddle Nursing Cover my rails started to curve which was really frustrating. I originally planned to do a quilt of all strips but I had to scrap that plan and do a split rail fence instead. I have found the best way to avoid this happening is to alternate the direction I sew the strips together. I think the best way to explain this is a video demonstration so I will try to do that soon. If you have questions in the meantime please send me a message or leave a comment and I will try to explain better.

The number of rails you need may vary a little because you will sometimes get 4 blocks per strips and sometimes only get 3. Press all of the seams flat in 1 direction. I used a combination of a jelly roll for continuity and fabrics from my stash for variance. That may sound strange but adding a few coordinating fabrics outside of a fabric line really adds interest to the quilt.

Cut your blocks using an 8" square ruler (go back to that linked post and check out my illustration). You need 35 blocks to follow my quilt exactly but this will change depending on what size block you use and the size you want your finished quilt to be. I used a square ruler rather than trying to use a straight edge because there's less room for error. As always, be VERY careful not to get your fingers caught in your rotary cutter. I always double and triple check that my ruler hasn't moved as I am cutting.

Arrange your blocks so that they make a diamond design. Don't worry if your seams don't line up perfectly. It is inevitable but that's ok! Do try and keep as straight a 1/4" seam allowance as possible but don't stress out too much. The success of this quilt is not dependent on your ability to do this perfectly. You will sew 7 rows 5 blocks across. Make a quilt sandwich by basting the backing layer, batting, and top together (I use safety pins), quilt, bind, and you'll have yourself a quilt!

Variations:
  • Honestly I think this quilt would look better if it was symmetrical but that's just me. To achieve symmetry with this pattern you would need an even number of rows and columns. I wanted to make this a lap quilt that could be draped over a chair or folded on the back of a couch for snuggling. A 4 column 6 row quilt was too small with my size block and a 6 column 8 row quilt was too big for my size block. Adjust the size of the block, add borders to the outside, or adjust the overall size of the quilt if you want symmetry. 
  • You could arrange the blocks in groupings of 4 with some sashing between each grouping
  • You could mix in some large blocks cut from one piece of fabric
  • You could use smaller strips (you will use more of them for each rail). I didn't have any problem using strips as small as 1" for Maura's Strata Blocks quilt but if you are having trouble with this, you might want to consider paper piecing. Film in the fridge has a great tutorial for using smaller scraps of fabric to achieve a similar look.
  • You could use larger strips (you will use less of them for each rail)


    Here are some pictures of the VT Quilt for your enjoyment. I put every ounce of love and friendship I feel for my friend and her family into this quilt. My hope is that the lucky silent auction bidder enjoys using it as much as I have enjoyed making it and sharing it with you. 

    You can't really tell from that first picture but I added my initials and the year to the bottom left corner (very poorly I might add). I'm still debating on whether or not to add a label to the back. What do you think?

    I'd love to see your version of what I am calling "Strata Diamonds"! Join the Flickr group and upload your own photos. 


    Happy Quilting!

    ps- My block cutting technique does leave you with a pile of scraps. For Mark's strata diamond quilt I used these scraps to create a border. I am going to use the VT Quilt scraps for something else but I haven't decided what that something is yet. Any ideas? 

    UPDATE: The VT quilt was very popular at the silent auction! The quilt sold for $150. I hope the new owners love it!

    Friday, July 9, 2010

    VT Quilt Update

    Last night I put all of my quilt top blocks together and was shocked to find that I still had a couple of hours left before I needed to force myself to go to bed.

    One thing you should know about me: on my best days I am a night owl. I will go to bed around 12 or 1230, read for an hour or so, and then turn my lights off. On my worst of days, I stay up until 230 or 3 quilting and when I get to bed I am still mind stippling a quilt or rearranging blocks on my design board. To have even a chance at going to sleep I have to read something to "reset" my brain. I made the enormous mistake of reading the Twilight books (I actually love the books but they are so ADDICTIVE) and on several occasions stayed up all night reading. I have since learned to read books I am capable of putting down at night, and to save the good ones for weekends and vacations. 

    So back to the quilt top. I decided to go ahead and make my "quilt sandwich" since I had extra time. To make a long story short and keep myself from rambling (hopefully) I couldn't find any tape. Agh! So I decided I would use my ironing board, iron, safety pins, and these clasp thingies I got a long time ago to put my layers together and baste. I also couldn't find my clasp thingies.  I think this is going to end poorly.

    I don't have any pictures right now because 1230 came along and all I could do was look over at my camera just out of reach from where I was sitting and back at my quilt pinned to my design board several times. I decided rather than take a picture I would call it a day and work on it some more this weekend after work.

    On a side note, I just finished reading the funniest tutorial on quilt binding ever! Megan....you are hilarious. I needed a good laugh today. Thank you!

    Wednesday, May 19, 2010

    Loves Pink - Part 5

    To wrap things up I thought I would talk about finishing process. I know there are many ways to finish a quilt and I would love to hear from you quilters out there! This is how I finished Leslie's quilt:

    First Layer: my quilt top
    Second Layer: 80/20 cotton poly-blend quilt batting.
    Third Layer: backing
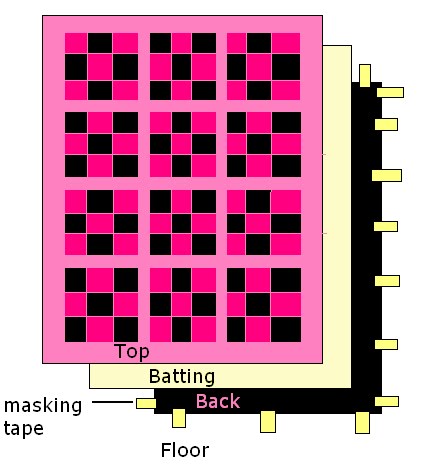
    I taped the backing to the floor face down (the front of the fabric facing the floor and the back of the fabric facing me. I made sure to slightly pull the back fabric evenly and tape down evenly around the edges. Next I laid the cotton blend batting over the back fabric. I have seen quilters line up one of the corners of the batting with one of the corners of the back so that the batting lines up evenly with the backing on 2 sides and the excess hangs over the 2 sides. I chose this method and saved my scrap backing and batting to use on smaller projects. Finally, I laid the top on the backing and batting so that all of the layers lined up.

    Basting can be done in a number of ways and this is something I plan on experimenting with but for now I just use safety pins. Ann uses a grapefruit spoon to lift the bottom of the pin (the pointy side) and hook it into the top. I haven't found a grapefruit spoon so I haven't tried this method but it looks like a big time, band-aid, and manicure saver. I placed basting pins about an inch from the edge all the way around the edges of the quilt and throughout the remainder of the quilt pinning each pin about 1 hands length apart.

    Next I "stitched in the ditch" which is stitching down along the seams of the blocks. I also went all the way around the edge of the quilt about 1/4" from the edge to keep the edges together under my binding. If I had had more time I would have quilted a bit more but I wanted to give this to Leslie for Christmas so I didn't get the chance.

    The finished size of the quilt was approximately 40.5x53 after I put on the binding. At Ann's suggestion I went with the mitered corner binding method. This is one of the more difficult binding techniques but once learned produces really nice corners on your quilt. To make the binding I cut strips of 2.5" fabric (black) and ironed them pressing the fabric in half long ways so that I had long strips of fabric 1 1/4" wide and double thickness. I joined each strip to the next with a mitered edge (45 degree angle) until I had one long strip of fabric equal to the perimeter of my quilt plus about 20 inches extra. This drawing shows how the binding fabric is sewn to the front of the quilt, folded back at a 45 degree angle and folded back over to create the mitered corner:
    I then flipped the binding over the edge of the quilt and machine quilted it down. I decided to machine quilt using a decorative stitch because I didn't have time to hand sew it. I have since taken this decorative stitch out and hand sewn the binding down and it looks much better.

    Leslie loves her quilt and keeps it on her bed. She and her dog Princess Maria snuggle up together with it every chance they get!

    Leslie's quilt front: 
    Leslie's quilt back: