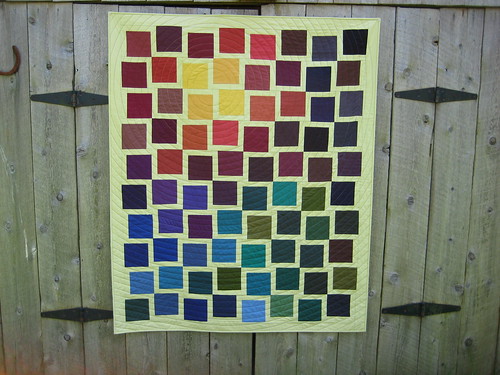
Showing posts with label Marshmallow Brochette. Show all posts

Sunday, July 10, 2011

Marshmallow Brochette QAL - Binding

Hello QALers,

This week we are binding our quilts! This is the last step in the QAL, a step I've been looking forward to reaching. Binding a quilt is the icing on the cake for me. All the piecing, all the basting, all the quilting finally comes together and becomes 'finished'! So exciting!

IMG_6166
the binding for May Angels Hold You Near

For my first 2 mini quilts I chose an orange binding with a geometric design. The first I chose myself, the second was picked by my cutie pie husband. What I love about both is that they are a small enough scale to really see the pattern and they add a pop of pattern to otherwise all solid quilts.

Girly version of the Marshmallow Brochette mini quilt:

NOVA Modern Quilt Guild - Preemie Challenge 1

NOVA Modern Quilt Guild - Preemie Challenge 1
I believe the binding is a Riley Blake print

Boyish version of the Marshmallow Brochette mini quilt:

NOVA Modern Quilt Guild - Preemie Challenge 1


NOVA Modern Quilt Guild - Preemie Challenge 1
Lizzy House Pearl Bracelet in Feather

I'd love to see what you've selected for your binding and your finished quilts! You can add your Marshmallow Brochette to the Threaded Mess flickr group anytime, now or later.

I hope you've enjoyed this quilt along. Thank you for putting up with me even though I was a little late some of the weeks. I've learned a lot from this first QAL that will help me do a better job in the future. I've got something really special up my sleeves so stick around. A little hint, it involves hexagons...

Hexagon Tutorial - Finished Basted Hexagon

Happy Quilting!

Sunday, July 3, 2011

Marshmallow Brochette QAL - Quilting

If we were all on schedule, this week would be for quilting. I, however, am not on schedule...BUT! I am making progress and progress is good :) Look at all this progress:

Marshmallow Brochette Squares

I was a little short on the 36 squares so I ended up using 8 of them twice but you can really only tell that in the middle where the two wood prints are. I have since switched a couple around to get a better gradient of color but this picture is almost what I ended up with.

When I DO get to the quilting stage, I am going to quilt it using concentric circles like this quilt made by Krista.

Krista was kind enough to do a tutorial which can be found in her flicker photostream. The circles will start somewhere in my lightest squares and echo outwards.

Need some other ideas on how to quilt yours?

How about an all over meandering stipple?

Emili
By 90milemissy

Or some simple straight lines?

NOVA Modern Quilt Guild - Preemie Challenge 1
please excuse the wrinkles! it's the quilt from being folded, not the quilting

Maybe some straight lines with a bit of echoing?
Marshmallow Brochette in yellow and grey
By Bijoux Baby
Or some seed square mazes?

NOVA Modern Quilt Guild - Preemie Challenge 1

Still not perfect? Check out Leah Day's The Free Motion Quilting Project for more ideas!

Happy Quilting

Tuesday, June 21, 2011

Marshmallow Brochette - Backing and Basting

Hello fellow QALers! This week I'm posting on backing and basting your quilt. If you're not quite there yet, no problem! Just keep chugging along and let me know if you run into any snags. I would love it if you posted pictures of your progress in the Marshmallow Brochette flickr group.

Before I get in to the next set of instructions, I just want to say how excited that you all are embarking on this journey with me. It's so...COOL (for lack of a better word right now) that there are those of you out there who liked my pattern enough that they wanted to make it, AND wanted to make it so much that they are participating in this quilt along.

Marshmallow Brochette QAL Group Progress

The above pictures were all added to the Marshmallow Brochette QAL flickr group by those of you participating. If I didn't include at least one of your pictures it's because it doesn't appear in the group or isn't sharable. I have really enjoyed following your progress and commenting on your pictures!

On to the instructions...

Well...sort of. This isn't a tutorial on creating your backing or basting. There are some great ones out there so if you need some assistance please google search for tutorials or check out youtube.

If you need to refer back to the supplies list for how much fabric you need for either the mini quilt or lap quilt, check out the first Marshmallow Brochette QAL post.

Step 1: Press your quilt top and trim any excess

IMG_5866

Boyish Mini Quilt

Step 2: Press your backing fabric. I don't have a picture of me actually pressing my backing fabric but here is one OF the backing fabric: *wink*

IMG_5872

Step 3: Make your quilt sandwich. I generally use a bit of masking tape to keep my backing fabric taut, 100% cotton batting, and safety pins to baste.

Boyish Mini Quilt

Basting is my least favorite part of the quilting process. If you feel the same, trudge through.We're in the home stretch!

Step 4: Shake off your quilt and get ready for quilting next week. I like to keep my quilts hanging or laying flat to avoid getting wrinkles before I am ready to quilt.

Happy Quilting!

Wednesday, June 15, 2011

Marshmallow Brochette QAL - Part 3.2

Hello Threaded Mess followers and Marshmallow Brochette QALers!

This weekend did not go as planned, nor did the start of this week. It's funny how life sometimes works out that way. Hopefully to some this delay of schedule is giving you the extra time you needed to do something else...

Without further ado, here are my measurements for each column of the lap size version of Marshmallow Brochette (exact cuts for the mini quilt were already provided):

By column my measurements were (from top to bottom piece):

**All of these measurements are for the size you CUT. The finished size will be smaller because of your 1/4" seam allowance**

Column A (left): 4" [square] 7" [square] 5" [square] 4" [square] 6" [square] 8" [square] 8" = 42"

Column B: 6" [square] 5" [square] 3" [square] 7" [square] 9" [square] 5" [square] 7" = 42"

Column C: 3" [square] 7" [square] 9" [square] 6" [square] 4" [square] 8" [square] 5" = 42

Column D: 5" [square] 5" [square] 5" [square] 7" [square] 6" [square] 6" [square] 8" = 42" 

Column E: 7 [square] 5" [square] 9" [square] 4" [square] 4" [square] 6" [square] 7" = 42"

Column F (right): 5" [square] 9" [square] 7" [square] 3" [square] 4" [square] 8" [square] 6" = 42"

For visual people, this is not to scale but here is how the cuts lay out:

According to Excel, this should give a nice wavy look that is part of the Marshmallow Brochette charm:


**All of these measurements are for the size you CUT. The finished size will be smaller because of your 1/4" seam allowance**

How is everyone coming along? I'd love to see pictures in the Marshmallow Brochette QAL flickr group!

Happy Quilting

Wednesday, June 8, 2011

News and Updates - Catching Up

Thank you to everyone who responded about the QAL! I promise to catch up but your understanding is appreciated. The good news is we really are in the home stretch! and I WILL catch up!

We DID find a car to replace my Mazda so I can cross that off my list. I love our new Pilot and can't wait to take it on a trip!

I finished binding the two quilts for Ava. Unfortunately I didn't have enough blocks for two quilts made from purple wonky star blocks but I had just enough to make one. As it turned out, I liked all the blocks that were turned in better together than I did separately so it all worked out in the end. For the second quilt, I made a strip quilt from my stash and here's a sneak peak:

Strip Quilt for Ava

Which will be bound in this:

IMG_6166

Here's a picture of the purple wonky star blocks before I pieced them:

IMG_6066

I will post some more pictures once I upload them from my camera. Both quilts are on their way to Pennsylvania to meet Ava.

Do. Good Stitches is off to a great start this month. I designed a Chartreuse and Raspberry Spiderweb quilt and some of the girls have already started making blocks:

By Muriel

IMG_5409
By Hollie

do. Good Stitches - June
By Jeni

do. Good Stitches - June
By Jeni
I'm really looking forward to working with these blocks!

We had a nice weekend down at the lake with family to celebrate our 1st Anniversary. Most of our family members were there with us and that was really special. I took a bunch of photos but these are my favorites.
My Nieces and Nephews
My nieces and nephews. We got to babysit the girls last weekend and had a blast at the park and nearby festival.
IMG_6108
My honey
Alissa and her Boys
My sister and her boys

Sophie and Maria
My niece loved Princess Maria (the puppy)
I have one of the sweetest friends a girl could have. Waiting in my mail for me the other day was a surprise package from Hollie.
Surprise from Hollie
I gushed over the fabric Hollie selected for her commissioned wonky star quilt. It's such a perfect fabric for binding and I love the color. When Hollie returned to her LQS to get some more for herself she bought an extra yard for me. Isn't she sweet?!
Surprise from Hollie
Hollie's gift was so thoughtful and the timing of her surprise couldn't have been any better because I was having a really tough day. I can't wait to use this fabric! Thank you Hollie! You're the sweetest!

Matt's sister graduated in May from Appalachian State University:
Maura's Graduation 5-7-2011
Maura and Ann

Maura's Graduation 5-7-2011
Matt, Me, Maura, Al, Carly, and Mark

Maura's Graduation 5-7-2011
Scott and Maura


That about wraps up all the updates I have for now. I still need to catch up on May and June do. Good Stitches blocks, A Dozen Quilters May and June Pillow Case Dresses (already sewn, just need to take pictures), do. Good Sitches Wonky Cross Quilt, update everyone on my exact cuts for the Lap size quilt in the Marshmallow Brochette QAL, and hopefully get another Inspired post out to you all.

I can't believe it's already June 8th. Where did May go? 

Happy Quilting

Monday, May 23, 2011

Marshmallow Brochette - Part 2.1: Bordering Your Squares

Hi QAL friends! I've gotten some questions on how to border the 5" squares with the 1.5" strips. When I pieced my borders and squares I followed these steps:

Step 1: Sew your square and strip together using a 1/4" seam. Make sure that the edge of the square and the edge of the strips line up as you guide your fabric under your machine. You can pin the pieces in place if you prefer.

IMG_5828

I generally snip my strips away from my blocks with scissors but if you would prefer you can use a rotary cutter or chain piece and then cut as I described in my earlier post. I typically repeat this for all of my squares until I have one side sewn for all.

Step 2: Sew your strip to the opposite side of the square you just sewed and trim the border strip as described in step 1. Repeat for all squares. Press.

IMG_5841

Step 4: Repeat the same steps for the remaining two sides.

IMG_5843

IMG_5845

IMG_5847

Until you have a big stack of pressed squares bordered on all 4 sides.

Marshmallow Brochette QAL

By the way, typically you should press your fabric toward the darker color, otherwise the darker color might show through to the other side. The above photos show that I pressed toward the lighter color. To be honest I really couldn't see my colored fabrics through the white so I didn't worry too much about it. It is up to you which direction you decide to press, and will also depend on your own fabric choices.

I hope this helps clear up any confusion! Please let me know if you have questions about any of the QAL steps. I would be happy to clarify any step in the process to make sure you are having the most enjoyable, successful experience possible.

Happy Quilting!

Monday, May 16, 2011

Marshmallow Brochette QAL - Final Mockup and Button

I know I said I would be doing one post a week, but this is more of an enhancement to the last post and not additional work. Without further ado, here is the final mockup for the lap quilt:

Marshmallow Brochette - Final Mockup

I chose to add an additional column of squares and an additional column of 5" strips so that the width of the quilt is more proportional to the height (finished size is now about 63 x 83 which will work well with a twin sized batting). I also added a 6th square to each column to make cutting and piecing easier based on the standard widths of fabric.

Also, I forgot to create a button for this QAL! Toni was nice enough to point that out and also make a button for me. Isn't she sweet? Here's Toni's button:


This is something I have only tried once before so I wanted to try my hand at it again. Here's my attempt at a button:


I like both of them for different reasons. Use which ever one you'd like on your own blog or website. Just make sure to link the image back to this blog so that others who want to join in the fun can find the Marshmallow Brochette QAL!

Happy Quilting

p.s. - this week we are gathering our materials. If you need some insight into my color selection process you can check out my original post on the fat quarterly blog for more information on how I selected fabric for my mini quilts.