To wrap things up I thought I would talk about finishing process. I know there are many ways to finish a quilt and I would love to hear from you quilters out there! This is how I finished Leslie's quilt:
First Layer: my quilt top
Second Layer: 80/20 cotton poly-blend quilt batting.
Third Layer: backing
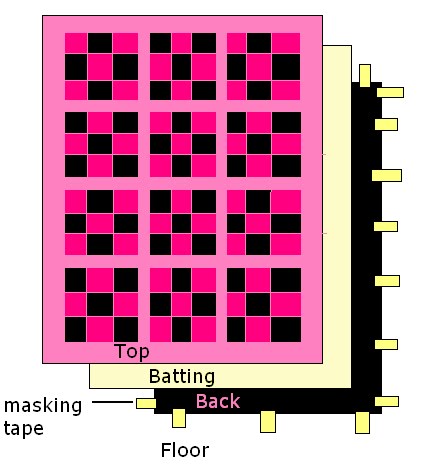
I taped the backing to the floor face down (the front of the fabric facing the floor and the back of the fabric facing me. I made sure to slightly pull the back fabric evenly and tape down evenly around the edges. Next I laid the cotton blend batting over the back fabric. I have seen quilters line up one of the corners of the batting with one of the corners of the back so that the batting lines up evenly with the backing on 2 sides and the excess hangs over the 2 sides. I chose this method and saved my scrap backing and batting to use on smaller projects. Finally, I laid the top on the backing and batting so that all of the layers lined up.
Basting can be done in a number of ways and this is something I plan on experimenting with but for now I just use safety pins. Ann uses a grapefruit spoon to lift the bottom of the pin (the pointy side) and hook it into the top. I haven't found a grapefruit spoon so I haven't tried this method but it looks like a big time, band-aid, and manicure saver. I placed basting pins about an inch from the edge all the way around the edges of the quilt and throughout the remainder of the quilt pinning each pin about 1 hands length apart.
Next I "stitched in the ditch" which is stitching down along the seams of the blocks. I also went all the way around the edge of the quilt about 1/4" from the edge to keep the edges together under my binding. If I had had more time I would have quilted a bit more but I wanted to give this to Leslie for Christmas so I didn't get the chance.
The finished size of the quilt was approximately 40.5x53 after I put on the binding. At Ann's suggestion I went with the mitered corner binding method. This is one of the more difficult binding techniques but once learned produces really nice corners on your quilt. To make the binding I cut strips of 2.5" fabric (black) and ironed them pressing the fabric in half long ways so that I had long strips of fabric 1 1/4" wide and double thickness. I joined each strip to the next with a mitered edge (45 degree angle) until I had one long strip of fabric equal to the perimeter of my quilt plus about 20 inches extra. This drawing shows how the binding fabric is sewn to the front of the quilt, folded back at a 45 degree angle and folded back over to create the mitered corner:

I then flipped the binding over the edge of the quilt and machine quilted it down. I decided to machine quilt using a decorative stitch because I didn't have time to hand sew it. I have since taken this decorative stitch out and hand sewn the binding down and it looks much better.
Leslie loves her quilt and keeps it on her bed. She and her dog Princess Maria snuggle up together with it every chance they get!
Leslie's quilt front:

Leslie's quilt back:

No comments:
Post a Comment