Showing posts with label quilting. Show all posts

Friday, August 13, 2010

I Heart Kona Solids

The other day I went to my local quilt shop and asked if they carried solids to which they responded "uh no" in a judging way that made me feel like I had just broken some quilting law or committed a major quilting faux pas. Well, as it turned out, they did have some solids in neutral tones of white, snow, cream, bone, toffee, brown, black, etc. I picked up some Kona Solid white because I was planning to use it for my 
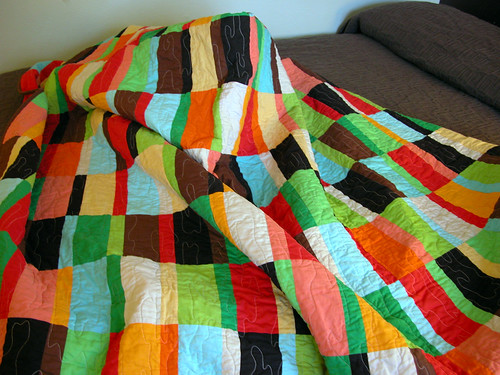
Love Pinwheel quilt and didn't let them convince me I needed a tone-on tone instead. I love solids! In fact, one of the first quilts that caught my eye when I first started looking around was this quilt:
picture from dioramarama.com. more pictures on this flickr page
I love the mixture of colors and simple, yet (in my opinion) stunning design. In my opinion solids are far from boring! I am a big fan of Cherry House Quilts and just love the new book, City Quilts. I still haven't picked it up because I thought I might be getting it as a gift for my 
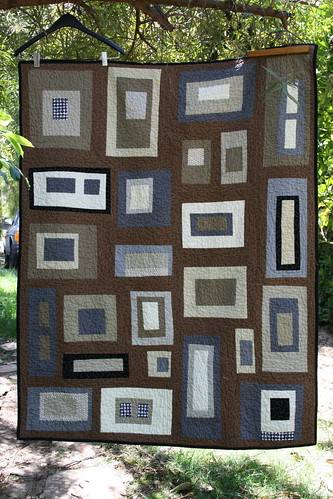
birthday but didn't so I will be picking it up soon! This one from the City Quilts book is called City lights:
on the Cherry House Quilts blog

It really reminds me of a sky scrapper! I really love this quilt called The Tempest. I remember her first post about this quilt where she described how she was trying to get a good shot of it down by the water but in the process of backing up on the dock to get the photo just right, she fell into the water! That definitely sounds like something I would do. Don't worry, she was ok and so was the quilt. Purple is probably my favorite color (it's really hard for me to pick just one color) and this quilt sings to me.
on the Cherry House Quilts blog
Even though solids are frowned upon by more traditional quilters (and apparently my local quilt shop), they are very popular among modern quilters alone or in combination with modern prints. For example:
from apartmenttherapy.com
from amyscreativeside.com
from filminthefridge.com
from handmadebyalissa.com
from ohfransson.com
I used Kona Solids for the backs and bindings for all but one of the wedding attendant quilts and I used them in the I Do quilt I am working on for Matt. I also used some solid orange (leftover from Matt's I Do quilt) for some of the blocks I made for Rainbow Around the Block. Kona Solids come in a huge variety of colors (221 colors right now!), are nice quality,  extremely versatile, and reasonably priced.  I used a birthday gift certificate from my Dad and step-mom Laurie to pick up a few of the new-ish Kona Solid fat quarter bundles from the Fat Quarter Shop (discount code from RetailMeNot.com) in pink, purple, and green:

Aren't they cute?! I am planning on using the pink in my girly guest bedroom, the purple in my more masculine guest bedroom, and the green in the master bedroom. I also picked up some Kona solid charms and a jelly roll at the Missouri Star Quilt Company when I won their YouTube.com gift certificate giveaway.
In addition to the fat quarter bundles and pre-cuts, I also recently bought a Kona color card. I had such a hard time finding one in stock somewhere but finally managed to snag the last one from Purl Soho.
This card is perfect for me because I do most of my fabric shopping online. Now I will be able to buy matching solid coordinates for my quilts without having to worry so much about the color on the screen being different in person (that happened with the I Do quilt for Matt). I literally scoured the internet trying to find this card. They are not in stock anywhere at the moment but in addition to PurlSoho.com where I bought mine,  I also saw them on Etsy.com, Hancocks-Paducah.com and PinkChalkFabrics.com. All of these places said they have the cards on order and they will be shipping soon. In my opinion this is a must have tool for anyone who wants to incorporate solids into their stash.

Check out Kona solids at your local JoAnn's or call your local quilt shop to see if they carry any. I think you'll agree after you use them that they are a really nice option to have in your stash. I will let you know how well it works to have the color card around once I've had a chance to use it more. I think it's going to be a really awesome tool!

Happy Quilting!

Wednesday, August 4, 2010

Why I'm Trying to Go Modern

Let me preface this post by first saying that I think traditional quilts and art quilts are absolutely gorgeous. I love going to quilt shows, reading quilt books, and surfing the web to see the beautiful work people have done in both categories and I definitely want to try my hand at both! Nothing in this post is intended to diminish or in any way criticize those quilting styles. That being said...

A few weeks ago I decided Northern Virginia needed a Modern Quilt Guild option. Why? I hope I don't offend anyone by saying this, but I just didn't think I would fit in with the quilt guilds in my area. My concern is that my lifestyle, availability, interests, age, fabric selections, and design style would be so different from others in more traditional guilds that I wouldn't feel as rich of a connection as I would with people who are like me and therefore not enjoy my experience as much.
  • I work all the time. I often work late nights, early mornings, and on weekends too. I never really know what my schedule is going to look like
  • I can't go to workshops or meetings in the middle of the day during the work week (because I'm working) 
  • I am 27 (happy birthday to me!) so much younger than most of the quilters I know
  • I'm drawn to fabric designers like Amy Butler, Joel Dewberry, Heather Bailey, Lizzy House, Anna Maria Horner, and Kona Solids 
  • I'm drawn to patterns by Cherri House, Denyse Schmidt, Amy Butler, and I also like making my own up because I like figuring things out for myself and learn better from mistakes than instructions
  • Quilting is something I love to do but it's not my only hobby. I also like to read, play xBox, wii, nintendo ds, and computer games, entertain friends and family (dinner, drinks, board games, etc), play with Lucy, take pictures, scrapbook, travel, decorate, draw, paint, and make jewelry (Lovie and Boo).
  • I've only been sewing since December 2008
I really like the concept of quilting as a stool with 3 legs: traditional, art, and modern. Modern quilting encompass the basic materials and techniques of traditional quilt making with the bend-and-break the rules approach of art quilting. While many traditional quilt guilds in my area have members who's work falls into the modern category, there isn't a guild in my area that primarily embraces that aesthetic. So I started one!

Some cool things I've learned so far:
  • you can create a free website on webs.com but if you pay extra you get more features
  • you can create a cool web toolbar icon at favicon
You're here so you have probably seen some of my quilts here, here, here, here, other stuff here and here and like my style. While I wouldn't totally put me in the "modern" category looking at those examples, consider that my stash is filled with more modern fabrics I just haven't cut into yet because my life is crazy and because I haven't figured out what I want to do with them yet. I do love batiks which probably makes me a traitor to the modern movement but they are just sooooooo so pretty.

I recently updated the home page with lots of information about Modern quilting so if you are interested go check it out. If you find yourself agreeing with the comments and "buzz", live in the Northern Virginia area (or surrounding area), and want to join just apply through the web!

Happy Quilting!

p.s. - I'm working on a batting scrap project tonight!

Tuesday, August 3, 2010

Threaded Mess Challenge Project: Batting Scraps

Hi Readers and Followers!

One of the things I have wanted to do with my blog are challenge projects where all of us would work on something theme related together. Guess what?? I have a challenge project for you!

Nancy over at Patchwork Penguin, who might I add is the first official NOVA Modern Quilt Guild member besides myself (sweet!), recently posted about not knowing what to do with batting scraps and inspired this challenge project. This is what her batting scrap stash looks like:

picture taken from Nancy's blog
Here's my stash:


My problem is that I rarely follow a pattern or have one to begin with. I don't take the time to plan things out on paper often and I don't always stick to whatever planning I have done. The pinwheel quilt is a great example of that! I started making the pinwheels, I had some fat quarters so I decided to border the pinwheels, I liked them so much I wanted more so I made more pinwheels and strips for borders, I've changed my design several times and still haven't decided which one I like best, and I have to figure out how to make it big enough for my guest bedroom bed. It started out as a lap quilt and now it has more than doubled that size. When I ultimately finish my quilt top I will likely have to get a batting that doesn't fit my top perfectly which means I am going to have some scraps. So where does the challenge come in? Well...

I challenge YOU, Readers and Followers, to join me in creating something from batting scraps.

How this works:
  1. Become a follower. There will be perks involved (hint, hint). If you already are, skip this step (and thanks for following!!). To follow, click the "follow" button on the right side of my blog.
  2. Leave a comment on this post letting me know you're going to participate in the challenge.
  3. Grab this button and put it on your website (if you have one)
 
Rules:
  • You must use scraps of batting (no new batting) for this project. If you don't have any, ask a friend (and get your friend involved too!).
  • You must create something you or someone else can use i.e. a finished product that can be hung, wrapped, pinned, stuffed, covered, snuggled, tossed, or otherwise used and loved. 
  • You must take pictures as you make your batting scrap project.
  • You must send me those pictures once you're done and tell us how you made it. 
I will be showing off my favorites on this blog (with your permission of course). If you want you can add them to the Threaded Mess flickr group or send them to me by email at threadedmess(at)gmail(dot)com.

I don't know about you but I work better with a deadline so let's say that all challenge projects must be submitted by October 3rd (that's 2 months!) which should give you plenty of time to participate even if you don't get to sew very often. 

1,2,3, go!

Happy Quilting!

p.s.- future challenge project hints: save your scraps! save your selvages! save your strips!

Friday, July 30, 2010

Love Pinwheels - Part 3

I drew a picture of what my Love Pinwheels quilt is starting to look like but here are some photos of the real thing:


So here are my thoughts....
  • I think it needs to be bigger! I think I like it so much that I want it to go on my guest bedroom bed so it needs to be big enough for a full mattress
  • I like the way the white looks between the blocks so I am glad I went ahead and bought some kona solid white for the sashing
  • I think it might need a pinwheel boarder incorporated somehow
  • I think I am going to incorporate that long strip you see into the back of the quilt. I haven't done that for a back yet but I like the idea of making the quilt 2 sided
I am taking a little break on Saturday to use the spa gift certificate Matt gave me for my birthday but other than that I'll be sewing until I drop!

I'd love your thoughts on my thoughts, to hear any other ideas you might have, or hear about what you're working on right now!

Happy Quilting!

Wednesday, July 28, 2010

The NOVA Modern Quilt Guild

I just updated the home page with lots of information about Modern quilting so if you are interested go check it out. If you find yourself agreeing with the comments and "buzz", live in the Northern Virginia area (or surrounding area), and want to join just apply through the web! I'm going to give it a few more days to see if there's any interest in my area and if not I'm going to cancel the web page I created and figure something else out.

Happy Quilting!

Monday, July 26, 2010

Happy Birthday to Me!

Last night Matt was so excited to start the day today that he said to me "I feel like a kid on the night before Christmas!" Why was my husband so excited? Because today is my birthday? Nope! He's excited because he's re-building his computer and his parts arrive tomorrow. Lucky for me he was also very excited to celebrate my birthday. He was so excited to give me my gift that he hid it in his nightstand and reached for it right after his alarm went off this morning. This year Matt gave me a gift certificate for a day at the spa including a facial, back massage, and spa manicure/pedicure and is taking me out to dinner at Macaroni Grill. What a treat right!? He's so good to me.

We then took Lucy for a nice long walk around the neighborhood together which is something we haven't done for a long time. We're going to try to get back in the habit of a long walk in the morning and the evening together with Lucy because all of us need the exercise.

To celebrate my birthday I brought in sour grape jelly bellies to share at work because I didn't have time to make cupcakes last night. Thankfully I won't go without them for my birthday this year because my brother Michael and his girlfriend Samantha are bringing me Georgetown Cupcakes Thursday night when they come over for dinner. They are also bringing some of the halibut they caught in Alaska recently. Do any of you know of a good recipe for halibut? My brother and his girlfriend can't come over because they have something else going on that they forgot they already committed to. Bummer!

The girls at Georgetown Cupcake are the stars of the TLC show "DC Cupcakes"! They inspire me because they quit their corporate jobs to do something they love and have been really successful. I would love to do that someday...just quit my job, stay home with the kids we will have someday, and do something quilting/sewing/crafting related instead of task plans, mock-ups, requirements, testing, peer reviews, meetings, analysis, documentation, spreadsheets, etc.


What would you do if you could quit your day job?

Happy Quilting!

Sunday, July 25, 2010

Back from the Beach

Hey friends!

It's been awhile....

I've been at the beach with family and friends all weekend soaking up the sun, spending time with the babies in the family which renewed my desire to have children in the near future, and just taking a break from my normal life which is nice to do sometimes.

I got to spend a lot of time with my brother Michael and his girlfriend Samantha, I got to swim and play in the sun, I started working on a hand-sewing project, and I FINALLY successfully got my nephew Benjamin to go to sleep. Ben is 9 months and even though I have tried many, many times this was the first time I didn't have to give someone else a try. I don't remember it being that hard with his brother Coleman.

My hand sewing project deserves a post of it's own because it's that neat but I'm pretty tired tonight so I'm just going to have to make this short and sweet.

I have the hexi-bug! I read several modern quilting blogs and many of them have been bitten as well. I have enjoyed looking at their projects so much that I decided I would give it a try as well. I am using  the English paper piecing method and doing this all by hand. I am hoping to make a cool accent pillow for my girly guest room. This was the perfect project to bring with me in the car and to the beach because each hexagon required a small amount of fabric, had lots of room for error, and is something I can pick up and put down easily.


a. Template made from heat resistant Mylar. I used "c" to trace the hexagon onto the Mylar and then used a ruler to trace 1/4 inch allowance
b. Finished hexagons. The paper pieces were placed against the "wrong" side of the fabric and the edges were basted down over the paper pieces using the 1/4 inch seam allowance I left myself
c. My 1" hexagon paper pieces (one large pack of 600 was $30)
d. My unfinished hexagons cut from scraps I had laying around from different projects
e. 3 hexagons hand sewn together. The paper will stay in until I have hand sewn all of the hexagons together

I taught myself the "quilter's knot" for this project which reminds me of the fisherman's knot my dad tried to teach me a long time ago. I used 50 weight 100% cotton thread in white. most of the fabric is Amy Butler but I have a little Tina Givens in there and some of the pinks I used in Leslie's Loves Pink

The paper pieces were a bit on the expensive side so I am going to look around to see if I can find a Cricut cartridge that has a hexagon.

I am honored and humbled that 8 of you have decided to follow my blog using Google Connect. I am not sure how many more of you are out there who use an RSS reader. If you're out there, let me know! I'd love to hear your comments or suggestions.

Happy Quilting!

Tuesday, July 20, 2010

A Quilt Just For Me - Part 2

I have been looking around for quilt patterns that make me happy and that represent my style for my Quilt Just For Me. I think I've found something that is totally "me"! Katie of Katie Made has a great tutorial available for download from scribed. You can find it from her blog and it's free to download from Scribd if you have an account. I am going to try to only use fabrics from my stash. I may end up getting some solid fabric for the bases because I like that look but all of the strips will definitely be from my stash.


You can check what other versions of these blocks look like on these websites:

Sew I Was Thinking
{Bee Mod} Quilting Bee Flikr group
Tallgrass Prairie Studio
Quiltville
Little Red Hen
Whipup

Projects and Love Pinwheel Quilt - Part 2

I now have PLENTY of fabric to make some of the projects I've had in mind and then some. Enough fabric to last me a long, long, lonnnnnnng time. What's on my list you ask?
  • Make myself a skirt or two
  • Re-fashion some t-shirts with ruffles, rosettes, applique, etc so they are a little more exciting
  • Make baby quilts for my nephews and nieces
  • New cover button jewelry for my Etsy shop Lovie and Boo
  • A quilt for myself (you should too!)
  • Coordinating outfits for my nieces
  • Coordinating outfits for my brother's girlfriend's nieces
  • Burp cloths
  • Decorate my sewing room
  • Wrist rest and mouse pad for my computer
  • Throw pillows for my family room sofa and love seat
  • Euro shams and a throw pillow to match the quilt Ann made me for graduation for our boyish guest room
  • Euro shams, throw pillows, and a quilt to go in my girly guest room
  • Throw pillows for my rec room sofa
  • Make wall art for the girly guest room
  • More blocks for Rainbow Around the Block
Since this a quilting blog I will share with you all some brainstorming ideas I have been tossing around in my head for my pinwheel quilt. I used an Amy Butler Love charm pack and a Bella Solid charm pack in Snow to make the pinwheels and then bordered each pinwheel square with 2.5" strips of Amy Butler Love. I used every fabric in the line (the quilting fabric weight) once in the pinwheel and once around the pinwheel. Each square is a little different. I had 2 boxes left over and some scraps from my strips which I combined in one long strip to put on the back of the quilt.

I originally set out to make a lap quilt because I can do the basting and the quilting myself very easily at that size. The problem is, I think it's going to be too busy unless I do some sort of intervention. Here's the idea of what it's going to look like now:


I am thinking that if I add some sashing between those squares in 1 color (like the snow color I used in the pinwheel) that it would tie the quilt together better and it wouldn't look as busy. What do you think? Any other ideas

Saturday, July 17, 2010

I Do Part 3

I am so excited to tell you that my I Do quilt top is DONE! It is a monstrosity. It is almost twice the size of my design board and puddles at the bottom even though I have hung it as high as I can reach. Matt loves it because "it should give us plenty of cover to snuggle under". I love my husband!

Here are some photos of what I could take:


I have really enjoyed this project. It's modern, it's vibrant, it shows off the fabric I selected, it was relatively easy to put together, and even though it's taken me a long time start to finish I probably could have done it in a lot less time if it was my only project. You can buy the pattern here at Cherry House Quilts. I'm not sure about where to send you for the fabric but I purchased most of it online at Fabric Depot and Hancocks of Paducah.

I would LOVE to buy the new Cherri House book City Quilts but it is my birthday on the 26th and I try not to buy anything for myself during my birthday month. I have of course cheated and bought some Lizzy House Red Letter Day fabric. I wish I could have found more but this line seems to be out of production. So sad! If you know of any stores still selling it please let me know!

I hope you're weekend is starting off great! Leave a comment and let me know what projects you're working on right now. I'd love to hear about them!

Happy Quilting!

Friday, July 16, 2010

Rainbow Around the Block Part 3

Hello fans and followers!

I just wanted to give a quick update about Rainbow Around the Block. As you know, I made a few blocks to donate back in June to help out with this project. Anna Maria Horner and her kids made a movie! Check it out:


Now I am inspired to go make some more blocks! What are you working on this weekend?

Wednesday, July 14, 2010

The VT Quilt is Finished!

It is done. 

The Breakdown:
*100% Cotton batiks
*Combination of oranges and maroons (VT colors)
*Square blocks made from 6 strip rails
*Blocks were cut using a square ruler turned 45 degrees so that the corners line up between the 3rd and 4th strip
*Blocks were pieced to make a diamond effect
*Backing is maroon with orange and green leaves with gold outline
*Quilted with variegated orange, gold, and maroon thread on top and maroon on the bottom
*Quilting design is 4 petal flowers that echo 3 times with curved lines connecting the flowers
*Binding is the same as the backing

If you haven't been following my blog for this entire project you can check out my older posts for more information:

Making the rails and blocks
Arranging the blocks
Quilt top
Basting and quilting
Finished quilting and trimming
Binding

If you want to make make a quilt like this you will need around 60-72 strips measuring 2.5"x45" (jelly roll size). The actual width of your strip may vary a bit but you want to use the full width of the fabric from selvage to selvage, whatever that may be. Combine a random assortment of 6 strips sewn together on their longest side to create your "rail".

When I first tried this technique (sewing long strips together) with Alissa's Cuddle Nursing Cover my rails started to curve which was really frustrating. I originally planned to do a quilt of all strips but I had to scrap that plan and do a split rail fence instead. I have found the best way to avoid this happening is to alternate the direction I sew the strips together. I think the best way to explain this is a video demonstration so I will try to do that soon. If you have questions in the meantime please send me a message or leave a comment and I will try to explain better.

The number of rails you need may vary a little because you will sometimes get 4 blocks per strips and sometimes only get 3. Press all of the seams flat in 1 direction. I used a combination of a jelly roll for continuity and fabrics from my stash for variance. That may sound strange but adding a few coordinating fabrics outside of a fabric line really adds interest to the quilt.

Cut your blocks using an 8" square ruler (go back to that linked post and check out my illustration). You need 35 blocks to follow my quilt exactly but this will change depending on what size block you use and the size you want your finished quilt to be. I used a square ruler rather than trying to use a straight edge because there's less room for error. As always, be VERY careful not to get your fingers caught in your rotary cutter. I always double and triple check that my ruler hasn't moved as I am cutting.

Arrange your blocks so that they make a diamond design. Don't worry if your seams don't line up perfectly. It is inevitable but that's ok! Do try and keep as straight a 1/4" seam allowance as possible but don't stress out too much. The success of this quilt is not dependent on your ability to do this perfectly. You will sew 7 rows 5 blocks across. Make a quilt sandwich by basting the backing layer, batting, and top together (I use safety pins), quilt, bind, and you'll have yourself a quilt!

Variations:
  • Honestly I think this quilt would look better if it was symmetrical but that's just me. To achieve symmetry with this pattern you would need an even number of rows and columns. I wanted to make this a lap quilt that could be draped over a chair or folded on the back of a couch for snuggling. A 4 column 6 row quilt was too small with my size block and a 6 column 8 row quilt was too big for my size block. Adjust the size of the block, add borders to the outside, or adjust the overall size of the quilt if you want symmetry. 
  • You could arrange the blocks in groupings of 4 with some sashing between each grouping
  • You could mix in some large blocks cut from one piece of fabric
  • You could use smaller strips (you will use more of them for each rail). I didn't have any problem using strips as small as 1" for Maura's Strata Blocks quilt but if you are having trouble with this, you might want to consider paper piecing. Film in the fridge has a great tutorial for using smaller scraps of fabric to achieve a similar look.
  • You could use larger strips (you will use less of them for each rail)


    Here are some pictures of the VT Quilt for your enjoyment. I put every ounce of love and friendship I feel for my friend and her family into this quilt. My hope is that the lucky silent auction bidder enjoys using it as much as I have enjoyed making it and sharing it with you. 

    You can't really tell from that first picture but I added my initials and the year to the bottom left corner (very poorly I might add). I'm still debating on whether or not to add a label to the back. What do you think?

    I'd love to see your version of what I am calling "Strata Diamonds"! Join the Flickr group and upload your own photos. 


    Happy Quilting!

    ps- My block cutting technique does leave you with a pile of scraps. For Mark's strata diamond quilt I used these scraps to create a border. I am going to use the VT Quilt scraps for something else but I haven't decided what that something is yet. Any ideas? 

    UPDATE: The VT quilt was very popular at the silent auction! The quilt sold for $150. I hope the new owners love it!

    Monday, July 12, 2010

    A Quilt Just For Me

    Since December 2008 when I started quilting and sewing I have made.....

    Quilted Projects
    Leslie Loves Pink
    Alissa's Nursing Cuddle Cover
    Laurie's Lady Bug
    Alissa's Split Rail Fence
    Leslie's Strata Flowers 
    Maura's Strata Squares
    Samantha's Anything Goes
    Mary's Strata Diamonds
    Nick's Color Block Split Rail Fence
    Mark's Strata Diamonds
    Tommy's Lake Shore
    Michael's Tackle Box
    Pete's Crossword Puzzle
    Kate's Scrappy Turtle Coasters
    Laurie's Black and White Quilted Book Cover
    Keith's Manly Quilted Book Cover
    Pat's Purple Quilted Book Cover
    Gloria's Zen Quilted Coffee Cozy
    Babette's Quilted Coffee Cozy
    Anne's Quilted Coffee Cozy
    Susan's Quilted Coffee Cozy 

    Sewing Projects
    A fleece blanket for my mom
    4 Red and Black batik place mat
    3 pinafores for family
    3 pillowcase dresses for family
    2 pairs of baby shoes
    Appliqued onesies for family
    Hair bows
    Flower girl dress
    Dress for my brother's girlfriend's niece
    All sorts of stuff for my Etsy shop Lovie and Boo
    Rainbow Around the Block blocks 

    Works in Progress
    VT Quilt (Silent Action work in progress)  UPDATE: Finished!
    Matt's I Do top (work in progress)


    I have made quilts, covers, cozies, clothing, shoes, hair accessories, broaches, started an Etsy Store where I sell cover button jewelry -- all for other people.  I'm probably forgetting some things but the point is, I haven't made anything just for me! The closest i have come to something for myself is a batik project made from 3 layer cakes (this thing is HUGE), a shirt that came out devastatingly ugly, a skirt with a similar result, my garter belt for my wedding (I didn't have time to do it properly so it was hot-glued together), and my pinwheel project that is still hanging in piles on my design board.  I love making things for others but at some point I've got to enjoy all that hard work right?

    Today Megan at The Bitchy Stitcher posted some teaser photos of her next project: a quilt for herself! I checked it out and I am hooked. I am going to finish up my works in progress, finish up the other two that I have already started (they don't really count because I started them before I found out about this movement), and start a quilt JUST FOR ME!!


    Now the question is: Do I buy more fabric or use what I have? Decisions, decisions....

    NOVA Modern Quilt Guild

    Interestingly enough....the closest modern quilt guild in my area is the D.C. Modern Quilt Guild. So guess what? I am going to try starting a NOVA chapter! Am I crazy? Probably...but if it works out I will be so excited!

    I would love to start a Northern VA group centered in the Fairfax County, Loudoun County, and Prince William County area. I would like to set this up as The NOVA Modern Quilt Guild. There is a D.C. Modern Quilt Guild and I see that someone was interested in a Fredricksburg Modern Quilt Guild on The Modern Quilt Guild website but I think this area is big enough that we could benefit from having all 3 guilds. I am hoping there are others in my area who are interested!

    If you live in the greater Northern VA area and are interested in being a founding member of the NOVA Modern Quilt Guild please contact me through my blog or leave a comment.  We will need guild leaders and members to get things started and place to meet.

    Happy Quilting!


    UPDATE: Thanks to Patchwork Penguin I'm going to add some more information for those of you who are interested. 


    What is Modern Quilting? 

    There has been a lot of discussion on what is considered a "modern" quilt these days. Some people feel like it is just really, REALLY, REALLY traditional quilting. I have seen a lot of traditional quilt blocks and techniques being updated in a fresh, fun way with modern fabrics and color combinations (check out Anna Maria Horner's blog) and I have seen a lot of "rules" being thrown out the window (check out Leah Day's 365 Days of Free Motion Quilting Filler Designs). I would suggest checking out the "About Us" page on The Modern Quilt Guild page for more information. They describe it much better than I can.


    Why do I consider myself a "Modern" quilter? 
    For me, it's more about attitude towards quilting and style choice. I find myself drawn to clean lined designs like Cherry House Quilts with more simple color palates and patterns that show off the fabric rather than show off my ability to make something from really tiny pieces of fabric (ok--there's some skill issues involved in that, as in: I don't have the skills necessary yet but I'm working on it). I find myself oohing and ahhing over Lizzy House, Heather Bailey, Amy Butler and Joel Dewberry fabrics who take a "modern" approach to colors and patterns. I'm interested in starting a chapter in the NOVA area because I don't know anyone like me quilting in this area yet and I would like to!


    I hope this answers some questions but if not, leave a comment and I will add some more!

    Friday, July 9, 2010

    VT Quilt Pictures

    I guess I didn't sleep very well last night because I woke up so tired. I know I am not going to get very much done tonight so I thought I would preemptively post pictures of the quilt before I take it down from my design wall and make an attempt at quilting it some more.


    I decided to try something a little different than just my standard stippling. The quilting is a 4 petal flower that echos 3 times right now but I am going to connect all of the flowers somehow....I guess I will figure that out tonight. I've been really inspired lately to try something different from my standard stippling because I've been reading Leah Day's 365 Days of Free Motion Quilting Filler Designs blog. You rock Leah. You totally rock. If you haven't checked her site out, "do it".


    Happy Quilting!

    VT Quilt Update

    Last night I put all of my quilt top blocks together and was shocked to find that I still had a couple of hours left before I needed to force myself to go to bed.

    One thing you should know about me: on my best days I am a night owl. I will go to bed around 12 or 1230, read for an hour or so, and then turn my lights off. On my worst of days, I stay up until 230 or 3 quilting and when I get to bed I am still mind stippling a quilt or rearranging blocks on my design board. To have even a chance at going to sleep I have to read something to "reset" my brain. I made the enormous mistake of reading the Twilight books (I actually love the books but they are so ADDICTIVE) and on several occasions stayed up all night reading. I have since learned to read books I am capable of putting down at night, and to save the good ones for weekends and vacations. 

    So back to the quilt top. I decided to go ahead and make my "quilt sandwich" since I had extra time. To make a long story short and keep myself from rambling (hopefully) I couldn't find any tape. Agh! So I decided I would use my ironing board, iron, safety pins, and these clasp thingies I got a long time ago to put my layers together and baste. I also couldn't find my clasp thingies.  I think this is going to end poorly.

    I don't have any pictures right now because 1230 came along and all I could do was look over at my camera just out of reach from where I was sitting and back at my quilt pinned to my design board several times. I decided rather than take a picture I would call it a day and work on it some more this weekend after work.

    On a side note, I just finished reading the funniest tutorial on quilt binding ever! Megan....you are hilarious. I needed a good laugh today. Thank you!

    Wednesday, July 7, 2010

    One More Thing...

    Since my iron is out of commission and I don't have a replacement yet, I didn't really know what to do with myself last night. I decided to stop passive-aggressively avoiding Matt's I Do quilt borders and took my stitches between the blue border and the pink and purple border out. I took my time and was very careful and luckily nothing bad happened.

    The next step is to add some fabric to the pink and purple border strips so that they will accommodate the addition of the black border. I will sew the black border on and then add the longer pink and purple border back on.

    Finally, I will find a fabric for the back. This thing has gotten really big with the addition of borders so I am either going to have to piece something together or find something equally big. Have you ever used a bedding sheet for a quilt back before? I am intrigued by this idea but I don't have any experience with it personally.

    Friday, July 2, 2010

    Love Pinwheels - Part 1

    I thought I would share a few pictures of what I have been up to tonight! I got my order from the Missouri Star Quilt Company which included an Amy Butler Love charm pack and Bella Solid white charm pack which I am going to use to make a pinwheel quilt. I know, I know...this is the same combination of fabrics used in the Missouri Star demo of the pinwheel technique but I llllooovvvvveeeeeddddd it sooooooo much and I am a sucker for Amy Butler fabrics anyways. I feel a bit unoriginal but I know I am going to love it when it's done and it will look beautiful in my girly guest room.

    So here are some pictures but pay no attention to the fact that my threads don't match, that there's all sorts of junk under my extension table, or that there's a Chinese takeout menu under there...

    Starting to sew the squares with the "right" sides together:


    I sewed until I got a 1/4" from the edge, left my needle down, and turned the corner:


    A couple of pictures of one of my squares sewn on all 4 sides. I probably didn't need to back stitch but it's habit:


    I just realized that I didn't take any pictures while cutting but that's probably for the best because I am very accident prone. Here are my triangles:


    I ironed all of the seams the same direction:


    Here are my squares ready to be made into pinwheels:


    I brought them to my sewing area and chain stitched them top to bottom:


    The look a bit like flags when they are chained stitched like this:


    I cut all of the now rectangles:


    Finally, I stacked my rectangles so I can continue tomorrow. I will press them and get them ready to be sewn into pinwheel squares:


    One last picture...My little "helper" was at it again. She kept trying to get under my table to lay down and I kept having to send her away because she was in the way of my pedal. She looks so pitiful!!


    I've decided that I am going to take off the pink and purple border so I can add the second black border. I know it's a waste of thread and will be time consuming but I also know that I will love it that much more when it's all done.