I've been neglecting to post my winnings from another giveaway but I feel compelled to finally fess up. I was waiting to announce the good news along with some other good news but that didn't exactly happen the way I thought and prayed it would. We are still hopeful we will be blessed with another baby in the future, but for now, check out this adorable cutie pie (all photos are from The Industrial Cottage Inc):
Oh how I love that Anna Maria Horner print paired with those baby blues!
Industrial Cottage did a giveaway through Dear Lillie, one of my favorite blogs, and I was the lucky winner. For my winnings I selected the Gray and Sunny Yellow baby sling and it arrived made to order, just my size.
You can check out all of Molly's lovely slings in her Etsy shop and read more about what she does on her blog.
Many thanks to Molly for sponsoring the giveaway, many thanks to Jenni for hosting the giveaway, and many thanks to the Random Number generator for picking me!
Monday, November 7, 2011
Banner Day Giveaway Winner
This post is LONG overdue! I am so sorry for the delay Shea!
The lovely Shea of Empty Bobbin Sewing Studio generously did a giveaway for her banner pattern back in June and I was lucky enough to be one of the 3 winners. I had grand hopes of making a banner from the pattern and announcing my winnings that way, but one thing led to another in June and then July and so on. I still haven't made a banner yet but I uncovered my pattern recently below some junk on my computer desk and immediately gasped in shock! How could I be so careless??
I hope Shea will forgive me and I hope she won't mind me stealing some pictures from her post since I don't have any of my own to share.
I love her colorful versions!
I plan on making one or more which all together will say 'keep calm quilt on' to decorate my sewing room, but this pattern would work for just about anything including bridal showers, baby showers, baby/kid rooms, or the holidays.
I hope you'll check out her pattern at Pink Chalk Fabrics and other online retailers. Thanks again Shea!
Happy Quilting
The lovely Shea of Empty Bobbin Sewing Studio generously did a giveaway for her banner pattern back in June and I was lucky enough to be one of the 3 winners. I had grand hopes of making a banner from the pattern and announcing my winnings that way, but one thing led to another in June and then July and so on. I still haven't made a banner yet but I uncovered my pattern recently below some junk on my computer desk and immediately gasped in shock! How could I be so careless??
I hope Shea will forgive me and I hope she won't mind me stealing some pictures from her post since I don't have any of my own to share.
I love her colorful versions!
I plan on making one or more which all together will say 'keep calm quilt on' to decorate my sewing room, but this pattern would work for just about anything including bridal showers, baby showers, baby/kid rooms, or the holidays.
I hope you'll check out her pattern at Pink Chalk Fabrics and other online retailers. Thanks again Shea!
Happy Quilting
Thursday, November 3, 2011
New Page
I've been busy quilting but I haven't been able to find the time to blog about it. Such is life.
I managed to find time to quickly list some of the books I've been reading thanks to my Amazon Order History page. I was inspired by Heather of House of a La Mode to record all the books I read mostly so that I can remember in the years to come, but maybe you'll be interested too. As the page says, there are few comforts more exquisite than snuggling under a quilt and reading.
If you're a reader, check out my new Reading List page. If not, sit tight. Posts are coming!!! I just have to wrap up a few projects with deadlines.
Don't worry, I'm taking pictures!!
Happy Quilting (and snuggling) (and reading)
I managed to find time to quickly list some of the books I've been reading thanks to my Amazon Order History page. I was inspired by Heather of House of a La Mode to record all the books I read mostly so that I can remember in the years to come, but maybe you'll be interested too. As the page says, there are few comforts more exquisite than snuggling under a quilt and reading.
If you're a reader, check out my new Reading List page. If not, sit tight. Posts are coming!!! I just have to wrap up a few projects with deadlines.
Don't worry, I'm taking pictures!!
Happy Quilting (and snuggling) (and reading)
Wednesday, October 12, 2011
Quilted Paperback Book Cover - Part 4
PART4
This post is a continuation of- Quilted Paperback Book Cover - Part 1
- Quilted Paperback Book Cover - Part 2
- Quilted Paperback Book Cover - Part 3
Pin your opening closed
I just leave them sticking up and pull them out before they touch the end of my foot but pin perpendicular to the seam you're sewing if that works better for you.
Sew 1/8" seam all the way around the cover, starting with your open edge
You cover can now be done if you want it to be! That's right folks, if you want to be done at this point your cover will work just fine.
If you would like to add some additional quilting by hand (anywhere), machine quilting, embroidery, embellishments, etc. you can do so at this point. Just be careful not so sew the pockets to the cover as that would prevent your book from sliding in.
I ended up adding a bit of embroidery using Valdani perle cotton size 8 thread (from PurlSoho.com) but I'm not quite finished yet.
You can see in this picture that I've finished my covers several different ways: very thinly spaced straight line quilting, straight line quilting spaced further apart, hand quilting, or nothing at all.
The following are pictures of individual covers I have made recently. As you can see, they're all a little different:
![]() |
| string pieced cover, no quilting |
![]() |
| machine appliqued hexagons, echo hand quilting with variegated valdani perle size 8 thread |
![]() |
| single cut of fabric, variegated valdani perle size 8 stitching in all the light green lines |
My plan is to add some hand quilting in the solid gray areas to finish this cover off.
I hope you enjoyed this tutorial! These paperback book covers would make a great gift for the holidays to a fellow book lover. The measurements I used in the tutorial are for mass market paperback books and will fit most books in that category. The covers also work well for keeping the book you are reading private so that, as my friend recently mentioned, you can read smutty romance novels and no one will know! You could also use the same method to make a cover for a journal or notebook.
I'd love to see your creations! I hope you will add them to the Threaded Mess flickr group. If you do, I might just show your work off on this blog!
Happy Quilting
Tuesday, October 11, 2011
Quilted Paperback Book Cover - Part 3
PART 3
This post is a continuation ofToday we will be sewing together all of the pieces we cut yesterday.
The first step is to make your pockets. Layer your batting, outside cover piece face up, and inside cover piece face down. If you have a directional print, make sure you are layering and sewing so that your finished pieces are symmetrical. If you forget the order and layer the two fabric pieces in the wrong order, like I did below, it's ok...you won't be able to tell the difference.
Please note that you should be using a 3/8" foot (not a quarter inch foot) to piece your cover!
My 3/8" foot has a handy seam guide on it which is pretty helpful but not required.
Finger press your pocket fabrics open so that the batting is on the inside of the two fabrics. Both prints should be showing face out.
Sew down the seam side of your pocket 3/8" from the edge
Repeat steps for both pockets
Trim away excess batting
Layer you cover with the batting on the bottom, your outside cover fabric face up, and your pockets face down (the inside pocket fabric should be face up) so that the seams are on the inside and the raw edges are lined up with the outside raw edges of your cover fabric. If your fabric is directional, make sure to put each pocket so that the direction of the print is the same of the cover! I made this mistake doing this tutorial.
At this point, I go ahead and add a couple of pins to ensure my pockets stay in place
Then layer your inside cover fabric face down covering your other layers and lining up the edges with the other fabric layers
I also pin this layer into place around all edges to make sure it doesn't shift while I'm sewing.
You are going to leave a gap on the bottom edge of your cover so that you can turn your cover right side out. For me, 2.5" works well and is the size I would suggest. If you find you are having trouble with that small a hole you can unpick your stitches.
Sew a 5/8" seam along all 4 sides (except for the area you are leaving open to turn your cover)
I back-stitch at each corner on both sides of the corner to make sure it stays nice and strong.
When you are done sewing around all 4 edges (except for your opening) Trim off the excess batting
And clip your corners at a right angle (being careful not to clip the threads too close) so there's not so much bulk when you turn them right side out
Take out your pins. Don't forget the ones that are on the inside of your cover!
Turn your cover right side out by pulling the insides through the hole you left
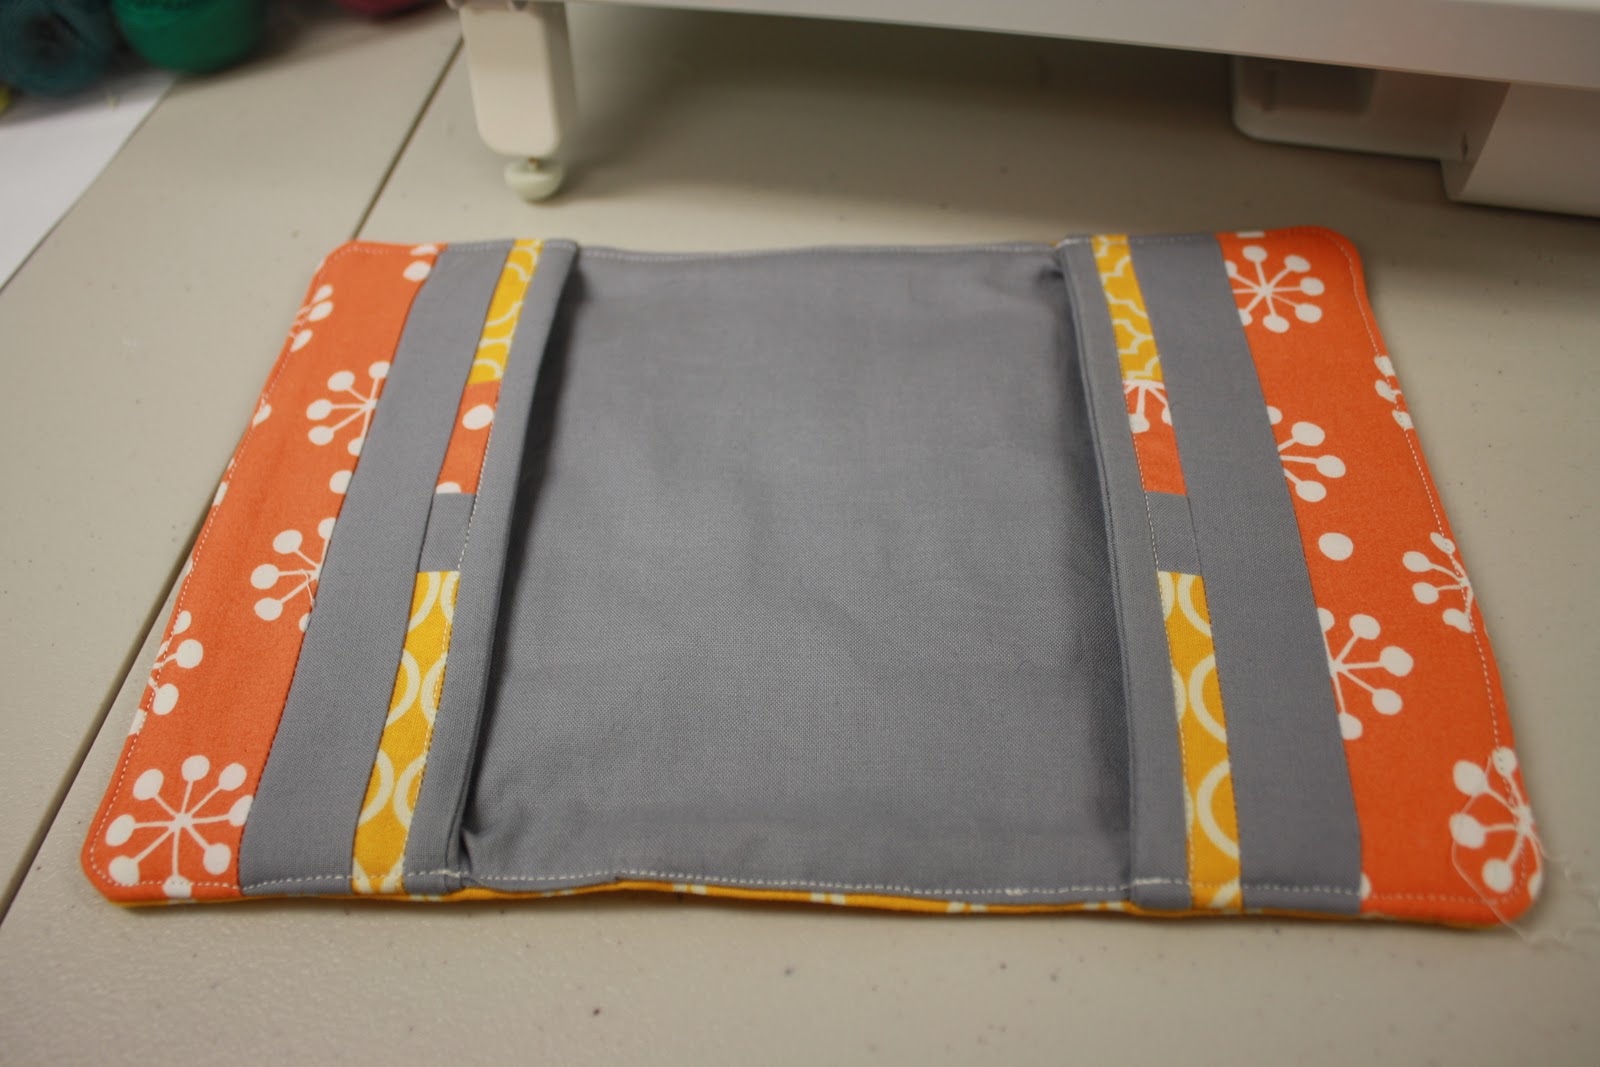
Flip the pockets over so that the outside pocket fabric is showing face up on the inside of your cover
You will have to push your finger into the inside corners of your pockets so that the layers line up correctly
Iron your cover and press the unfinished edges of your opening to the inside of the cover
Your cover is now almost ready!! Tomorrow I will give instructions for closing your cover and discuss some finishing options. Your homework is to construct your cover up to this point!
Happy Quilting
Subscribe to:
Posts (Atom)