Friday, May 21, 2010

I Do - Part 1

I'm planning something special for Matt to give as a gift at our wedding! I have an awesome pattern called "I Do" and plan to use a mixture of bright solids and beautiful coordinating batiks. Here's a preview:


More to come! What projects are you working on right now fellow quilters?
Update: I showed Matt the quilt top I made but I was unable to finish the quilt because I was working on another special project for the attendants at our wedding. He didn't mind that it wasn't finished and thinks it looks really great!

Thursday, May 20, 2010

Queen Batiks - Part 1

Since my first project was a gift for someone else, I wanted my second project to be just for me, Matt and Lucy. As I stated before, I am a fan of Hancocks of Paducah. What's great about the website is that they have sale sections for every dollar increment of fabric from $2.98 to 5.98 and a pre-cut sale section. I love buying things on sale so these sections are perfect for me. While browsing through one day I came across a listing for a batik quilt kit that I just had to have! Hancocks no longer sells this kit but I did find it on another website called Creative Quilt Kits. The kit I bought had 90 10"squares (for around $60! I love sales!) in beautiful Tonga batiks and super easy to follow instructions. There were 30 different fabrics and 3 pieces of each. Here's what it looked like online as a lap quilt:

The following is a picture of all of the different color 10" squares laid out on my bed. There are 3 of each square:


The cuts were made following these steps:

Stack 3 coordinating (but different) fabrics on top of each other with all of the edges squared up.
Cut 1 & 2 same size ( 1 1/2in - 4 1/2in)
Cut 3 & 4 same size (1 1/2in - 4 1/2in)
You’ll be left with a square piece of fabric


Mix and match pieces so that each color makes an "L" or a square in all 3 of the blocks. Sew edges on starting with the square and cut 4, then 3, 2, and then 1 last

Here's what it looked like on my cutting board:


The first square in these photos is what your block will look like when all the pieces are sewn together and the other 2 are what they look like before they are sewn together. And yes, I am sewing on my kitchen table. I didn't have my own sewing space in our apartment yet. I just realized that I never did take pictures of the sewing space I did make....oh well! We're in our new house now! Pictures to come.


Once the pieces are sewn together, trim the edges so you have squares all of the same size. I think these end up being 8 1/2in squares. There were 5 different versions of cuts for this pattern but you could also do all of the cuts the same if you wanted a more uniform look. I didn't love some of the combinations towards the end but I knew that once all of the blocks were pieced together that they would look better.


I laid out all of my finished blocks on my bed and played around with them until I was happy with the mix of color and pattern:


Here's a (not to scale) drawing of how the quilt came together:


I had enough blocks to make a quilt almost as big as a queen bed so to get the last few inches I added a few borders. I found the coordinating batik in a quilt shop with Ann and I think it really ties all of the fabrics together and pops even though it's not from the same line. I got enough to do a border and to use for the back of the quilt:


I chose to do all of my blocks with the Ls going in the same direction but I think it would look cool with 4 blocks turned in to each other like this as well:
Unfortunately this quilt is still not finished. My apartment wasn't big enough for me to stretch the quilt out and baste and my machine isn't big enough to quilt the darn thing. One of Ann's friends is going to quilt it for me one of these days when I have some spare funds. I am currently paying for wedding and new home expenses so this project is going to have to wait. I would love to see pictures of your version of this quilt!

Wednesday, May 19, 2010

Loves Pink - Part 5

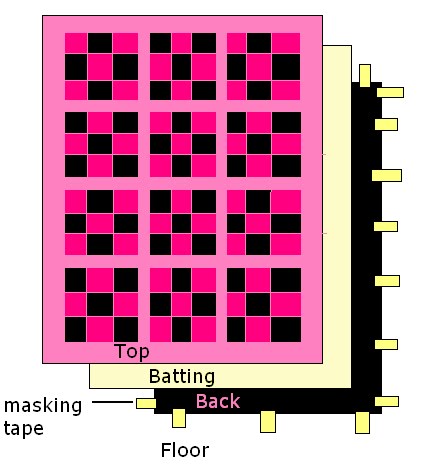
To wrap things up I thought I would talk about finishing process. I know there are many ways to finish a quilt and I would love to hear from you quilters out there! This is how I finished Leslie's quilt:

First Layer: my quilt top
Second Layer: 80/20 cotton poly-blend quilt batting.
Third Layer: backing
I taped the backing to the floor face down (the front of the fabric facing the floor and the back of the fabric facing me. I made sure to slightly pull the back fabric evenly and tape down evenly around the edges. Next I laid the cotton blend batting over the back fabric. I have seen quilters line up one of the corners of the batting with one of the corners of the back so that the batting lines up evenly with the backing on 2 sides and the excess hangs over the 2 sides. I chose this method and saved my scrap backing and batting to use on smaller projects. Finally, I laid the top on the backing and batting so that all of the layers lined up.

Basting can be done in a number of ways and this is something I plan on experimenting with but for now I just use safety pins. Ann uses a grapefruit spoon to lift the bottom of the pin (the pointy side) and hook it into the top. I haven't found a grapefruit spoon so I haven't tried this method but it looks like a big time, band-aid, and manicure saver. I placed basting pins about an inch from the edge all the way around the edges of the quilt and throughout the remainder of the quilt pinning each pin about 1 hands length apart.

Next I "stitched in the ditch" which is stitching down along the seams of the blocks. I also went all the way around the edge of the quilt about 1/4" from the edge to keep the edges together under my binding. If I had had more time I would have quilted a bit more but I wanted to give this to Leslie for Christmas so I didn't get the chance.

The finished size of the quilt was approximately 40.5x53 after I put on the binding. At Ann's suggestion I went with the mitered corner binding method. This is one of the more difficult binding techniques but once learned produces really nice corners on your quilt. To make the binding I cut strips of 2.5" fabric (black) and ironed them pressing the fabric in half long ways so that I had long strips of fabric 1 1/4" wide and double thickness. I joined each strip to the next with a mitered edge (45 degree angle) until I had one long strip of fabric equal to the perimeter of my quilt plus about 20 inches extra. This drawing shows how the binding fabric is sewn to the front of the quilt, folded back at a 45 degree angle and folded back over to create the mitered corner:
I then flipped the binding over the edge of the quilt and machine quilted it down. I decided to machine quilt using a decorative stitch because I didn't have time to hand sew it. I have since taken this decorative stitch out and hand sewn the binding down and it looks much better.

Leslie loves her quilt and keeps it on her bed. She and her dog Princess Maria snuggle up together with it every chance they get!

Leslie's quilt front: 
Leslie's quilt back:
 

Friday, April 16, 2010

Loves Pink - Part 4

To continue where I left off...

Lesson 6 - Be as consistent as possible with your piecing. I found that as a beginner I was at times a bit inconsistent with my seams and it didn't seem like a big deal but once my blocks started coming together I realized that even just a little bit off meant that my seams didn't line up together straight when I pieced all of the rows and columns together.  Just remember lesson 5 and try not to stress out about it. It was at this point that Ann said something along the lines of, "No one is perfect except God." So true! I had one of those "he's just not that into you" moments (if you haven't read the book, I highly recommend it - very liberating for me before I met my fiance) where I realized that my creations didn't need to be perfectly executed. They just need to be from the heart!

Lesson 7 - Square up your blocks. This was probably my biggest blunder on Leslie's quilt. If your blocks have nice clean edges it will be much easier for you to piece them together with your other blocks. I have recently invested in several different sized square rulers that I use to square my blocks when possible. Luckily the local JoAnn Fabrics is moving location so I have been able to pick up several of the things I need for quilting at clearance pricing. If my blocks are a different size than my rulers I use my cutting mat, rotary cutter, and ruler to square each block on the mat. I did not do this for Leslie's quilt so the edges of my blocks were not straight and therefore did not line up with my straight pieces of sashing (I have also heard this called lattice I think). I fudged the seams a little bit and you can't really tell but the edges of the quilt came out a little wavy in some places.

Lesson 8 - Distribute your colors and fabric designs evenly across your quilt. I wasn't really thinking about the overall look so much as I was trying to stick to the pattern I selected. I alternated between 4 black/5 pink and 5 pink/4 black blocks (see below). I had a bit of trouble moving around my blocks before I sewed them together because I was trying to get an even distribution of the fabric patterns. It worked out but I have since learned to start thinking about fabric distribution earlier in the process.
Lesson 9 - Stick with a system when you're sewing your blocks together. I am not sure if I was just tired or what but I had to take out my seams a couple of times because I realized I wasn't sewing the blocks in the right order. The system I use now is to lay out my blocks the way I am going to sew them together and then either pick up an entire column or entire row up in the order I am going to sew with the left-most or top-most fabric on top.

Lesson 10 - Iron down your seams. I should have put this a bit earlier because you want to iron all of your seams. Ann taught me to press the seams down in alternating directions but this is something I still struggle with. I have found that if I mess up or my seam flips the wrong way while I am sewing, I can usually press it down pretty flat or make a little snip on the seam where it is flipped the wrong way and press. If you do try this snip method be careful! You don't want to accidentally cut your seam. 

Stay tuned! More to come in my next post!

Loves Pink - Part 3

Throughout the process I learned a lot about sewing and quilting and I thought I would share some of them with you. Please keep in mind I have never taken formal classes but I have been given help and advice from Ann, my future mother-in-law, Ginny, my fiancĂ©’s aunt, and other quilters.


Lesson 1: Pre-wash your fabric. I recently skipped this process when I used jelly rolls for a specific quilt where I knew I would be using all of the fabric but I don't recommend it for your "stash" fabric. I think most people would agree that you should either pre-wash all of your fabrics or none of them but there are some definite benefits in washing them ahead of time.

First, there is sizing in your fabric as a result of the manufacturing process. This substance can drastically change the way your fabric feels and even how it looks. It can also be smelly and cause damage to your iron. Some people even claim that ironing the sizing has had adverse health effects on them. I have noticed that the sizing seems to oxidize on my iron a bit and smells but so far I haven’t felt sick from keeping it in the fabric.

Second, your fabric may be 45" on the bolt but may shrink down considerably after it is washed. It's better for it to shrink down before you cut rather than after because once you start sewing your fabrics together they may shrink differently and cause your creation to warp or pucker.

Third, most high quality manufacturers follow processes to minimize bleeding but it still happens. I highly recommend getting a dye-grabbing cloth in the wash. Carbona makes a wash-cloth good for 30 washes and Shout makes a disposable cloth that looks like a dryer sheet that is good for 1-3 washes (I am not sure if it says this on the box but that was my experience). You'll be shocked at how much these bad boys catch!

Are there drawbacks? Definitely. For example, the more raw edges on your fabric, the more likely the fabric will fray in the wash therefore the best time to wash your fabric is before you start cutting it. Also, when the fabric frays it can lead to a THREADED MESS! Get it? My blog name? The loose threads can tangle and knot and it’s sometimes difficult to get all of your fabrics straightened out. This can be avoided by hand washing but I don’t usually have time or the patience. If you do use your washing machine and you do get a threaded mess, try to use scissors to cut the tangled threads instead of your hands. It can be very painful if the threads cut your skin (trust me) and pulling on the threads can cause your fabric to get pinched along the edges. Another option to avoid the threads getting tangled together is to put the fabrics in a cloth laundry bag that ties at the top much like you would for delicate lingerie.

Lesson 2: Dry your fabrics until they are almost dry but still a little damp and then iron them. A little bit of moisture in your fabric will help you keep your fabrics from wrinkling before you iron them dry. Your iron should be on the setting best suited for the fiber content of your fabric. Since I mostly use 100% cotton, mine is usually on the highest or second highest setting.

Lesson 3: “Measure twice, cut once.” This is something Ann told me as I was first learning how to measure and cut fabric for Leslie’s quilt. I learned how to cut fabric using a cutting mat, ruler, and rotary cutter. Some people may not have access to these tools right away but they are a really good investment and will help you keep your edges crisp and cut quickly. For you quilters/sewers out there, what are your favorite brands for cutting mats, rulers, and rotary cutters and why?

Lesson 4: Don’t try to cut too many layers at once. The larger rotary cutters are pretty popular now because they allow you to cut through several layers of fabric in one pass. I think they are great but they lose their effectiveness as the layers of fabric increase. The fabric shifts under the ruler and you end up with edges that curve or angle in or out.

Lesson 5: Don’t stress! This is probably the most important lesson I learned. Sewing and crafting are fun! I definitely made my fair share of mistakes as I was cutting my fabric but thankfully Ann was there to remind me that everyone makes mistakes while cutting and that’s ok. Instead of getting upset, I saved the fabric for later use. One of these days I will show you what I made with my mistakes!

More to come!